Porting the Ada Runtime to a new ARM board
by Jérôme Lambourg –
Updated September 2018
An updated version of this porting guide is now available in the bb-runtimes repository.
As a first article (for me) on this blog, I wanted to show you how to adapt and configure a ravenscar-compliant run-time (full or sfp) to a MCU/board when the specific MCU or board does not come predefined with the GNAT run-time.
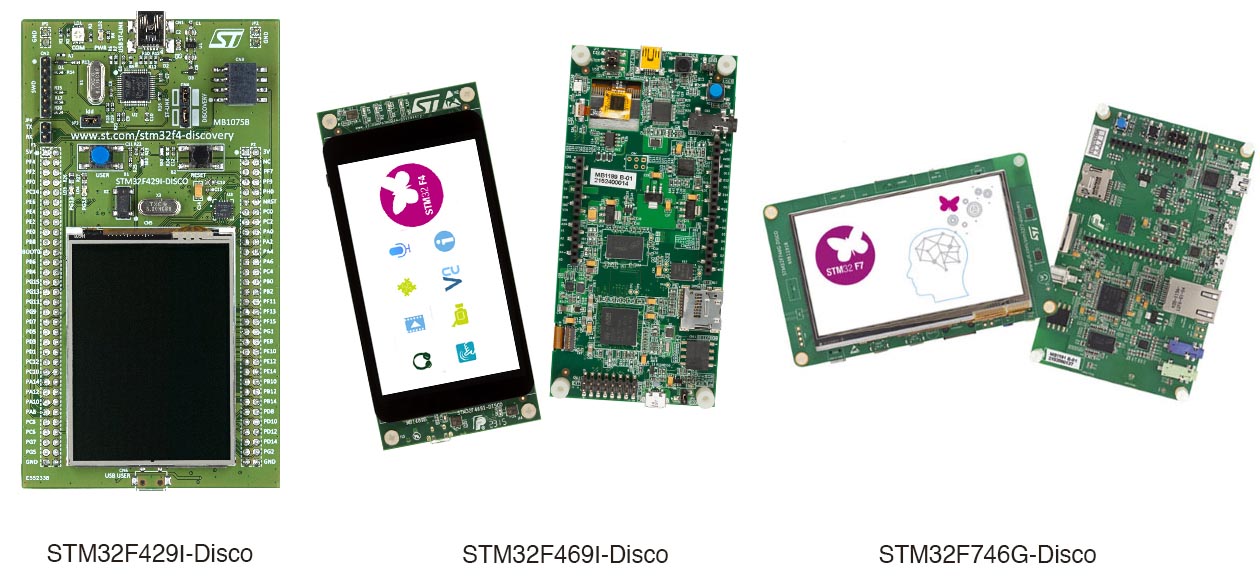
To do so, I will use GNAT GPL for ARM ELF and 3 boards of the same family: the STM32F429I-Discovery, the STM32F469I-Discovery, and the STM32F746G-Discovery.
These boards are interesting because:
- They're fun to use, with lots of components to play with (exact features depends on the board): LCD, touch panel, audio in/out, SD-Card support, Networking, etc.
- They are pretty cheap.
- They are from the same manufacturer, so we can expect some reuse in terms of drivers.
- The first one (STM32F429I-Disco) is already supported by default by the GNAT run-time. We can start from there to add support for the other boards.
- They differ enough to deserve specific run-time adjustments, while sharing the same architecture (ARMv7) and DSP/FPU (Cortex-M4 & M7)
So where to start ? First, we need to understand what is MCU-specific, and what is board-specific:
- Instructions, architecture are MCU specific. GCC is configured to produce code that is compatible with a specific architecture. This also takes into account specific floating point instructions when they are supported by the hardware.
- Initialization of an MCU is specific to a family (All STM32F4 share the same code, the F7 will need adjustments).
- The interrupts are MCU-specific, but their number and assignments vary from one minor version to another depending on the features provided by the MCU.
- Memory mapping is also MCU-specific. However there are differences in the amount of available memory depending on the exact version of the MCU (e.g. this is not a property of the MCU family). This concerns the in-MCU memory (the SRAM), not the potential external SDRAM memory that depends on the board.
- Most clock configuration can be made board-independant, using the MCU's HSI clock (High Speed Internal clock), however this is in general not desirable, as external clocks are much more reliable. Configuring the board and MCU to use the HSE (High Speed External clock) is thus recommended, but board-specific.
From this list, we can deduce that - if we consider the CPU architecture stable, which is the case here - adapting the run-time to a new board mainly consists in:
- Adapting the startup code in case of a major MCU version (STM32F7, that is Cortex-M7 based).
- Checking and defining the memory mapping for the new MCU.
- Checking and defining the clock configuration for the specific board.
- Make sure that the hardware interrupts are properly defined and handled.
Preparing the sources
To follow this tutorial, you will need at least one of the boards, the stlink tools to flash the board or load examples in memory, and GNAT GPL for ARM (hosted on Linux or Windows) that can be downloaded from libre.adacore.com.
Install it (in the explanations below, I installed it in $HOME/gnat).
The GNAT run-times for bareboard targets are all user-customizable. In this case, they are located in <install prefix>/arm-eabi/lib/gnat.
The board-specific files are located in the arch and gnarl-arch subfolders of the run-times.
So let's create our new run-time there, and test it. Create a new folder named ravenscar-sfp-stm32f469disco, in there, you will need to copy from the original ravenscar-sfp-stm32f4 folder:
- arch/
- gnarl-arch/
- ada-object-path
- runtime.xml
- runtime_build.gpr and ravenscar_build.gpr and apply the following modifications:
$ diff -ub ../ravenscar-sfp-stm32f4/runtime_build.gpr runtime_build.gpr
--- ../ravenscar-sfp-stm32f4/runtime_build.gpr	2016-01-09 14:09:26.936000000 +0100
+++ runtime_build.gpr	2016-01-09 14:10:43.528000000 +0100
@@ -1,5 +1,6 @@
 project Runtime_Build is
   for Languages use ("Ada", "C", "Asm_Cpp");
+  for Target use "arm-eabi";

   for Library_Auto_Init use "False";
   for Library_Name use "gnat";
@@ -8,7 +9,8 @@
   for Library_Dir use "adalib";
   for Object_Dir use "obj";

-  for Source_Dirs use ("arch", "common", "math");
+  for Source_Dirs use
+    ("arch", "../ravenscar-sfp-stm32f4/common", "../ravenscar-sfp-stm32f4/math");

   type Build_Type is ("Production", "Debug");

$ diff -ub ../ravenscar-sfp-stm32f4/ravenscar_build.gpr ravenscar_build.gpr
--- ../ravenscar-sfp-stm32f4/ravenscar_build.gpr	2015-04-30 12:36:37.000000000 +0200
+++ ravenscar_build.gpr	2016-01-09 14:11:37.952000000 +0100
@@ -1,7 +1,9 @@
 with "runtime_build.gpr";

 project Ravenscar_Build is
   for Languages use ("Ada", "C", "Asm_Cpp");
+   for Target use "arm-eabi";

   for Library_Auto_Init use "False";
   for Library_Name use "gnarl";
@@ -10,7 +12,8 @@
   for Library_Dir use "adalib";
   for Object_Dir use "obj";

-  for Source_Dirs use ("gnarl-arch", "gnarl-common");
+   for Source_Dirs use
+     ("gnarl-arch", "../ravenscar-sfp-stm32f4/gnarl-common");

type Build_Type is ("Production", "Debug");- ada_source_path with the following content:
arch
../ravenscar-sfp-stm32f4/common
../ravenscar-sfp-stm32f4/math
../ravenscar-sfp-stm32f4/gnarl-common
gnarl-arch
You are now ready to build your own run-time. To try it out, just do:
$ cd ~/gnat/arm-eabi/lib/gnat/ravenscar-sfp-stm32f469disco
$ export PATH=$HOME/gnat/bin:$PATH
$ gprbuild -p  -f -P ravenscar_build.gpr
If everything goes fine, then a new ravenscar-sfp run-time should have been created.
As it has been created directly within the GNAT default search path, you can use it via its short name (e.g. the directory name) just as a regular run-time: by specifying --RTS=ravenscar-sfp-stm32f469disco in gprbuild's command line for example, or by specifying 'for Runtime ("Ada") use "ravenscar-sfp-stm32f469disco"' in your project file.
$ ls
ada_object_path  adalib  gnarl-arch  ravenscar_build.gpr  runtime_build.gpr
ada_source_path  arch    obj         runtime.xml
Handling the STM32F469I-Discovery:
Let's start with the support of the STM32F469I-Discovery. Being the same MCU major version than the STM32F429, modifications to the run-time are less intrusive than the modifications for the STM32F7,
First, we need to make sure the board is properly handled by gprbuild. For that, we edit runtime.xml and change
type Boards is ("STM32F4-DISCO", "STM32F429-DISCO", "STM32F7-EVAL");
Board : Boards := external ("BOARD", "STM32F4-DISCO");
with:
type Boards is ("STM32F469-DISCO");
Board : Boards := external ("BOARD", "STM32F469-DISCO");
Now we're ready to start the real thing.
Memory mapping and linker scripts
In this step, we're going to tell the linker at what addresses we need to put stuff. This is done by creating a linker script from the base STM32F429-DISCO script:
$ cd arch
$ mv STM32F429-DISCO.ld STM32F469-DISCO.ld
# Additionally, you can cleanup the other STM32*.ld scripts, they are unused by this customized run-time
Next, we need to find the technical documents that describe the MCU. Go to http://st.com and search for "stm32f469NI" (that is the MCU used by the discovery board), and once in the product page, click on "design resources" and check the RM0386 Reference Manual.
From the chapter 2.3.1, we learn that we have a total of 384kB of SRAM, including 64kB of CCM (Core Coupled Memory) at 0x1000 0000 and the remaining at 0x2000 0000.
Additionally, we need to check the flash size. This is MCU micro version specific, and the specific MCU of the STM32F469-Disco board has 2 MB of flash. The STM32 reference manual tells us that this flash is addressed at 0x0800 0000.
So with this information, you can now edit the STM32F469-DISCO-memory-map.ld file:
MEMORY
{
  flash (rx)  : ORIGIN = 0x08000000, LENGTH = 2048K
  sram  (rwx) : ORIGIN = 0x20000000, LENGTH = 320K
  ccm   (rw)  : ORIGIN = 0x10000000, LENGTH = 64K
}
System clocks
The run-time is responsible for initializing the system clock. We need the following information to do this - the various clock settings that are available, and the main clock source.
STMicroelectonics provides a Windows tool to help set up their MCU: STM32CubeMX. Using the tool we can verify the clock settings:
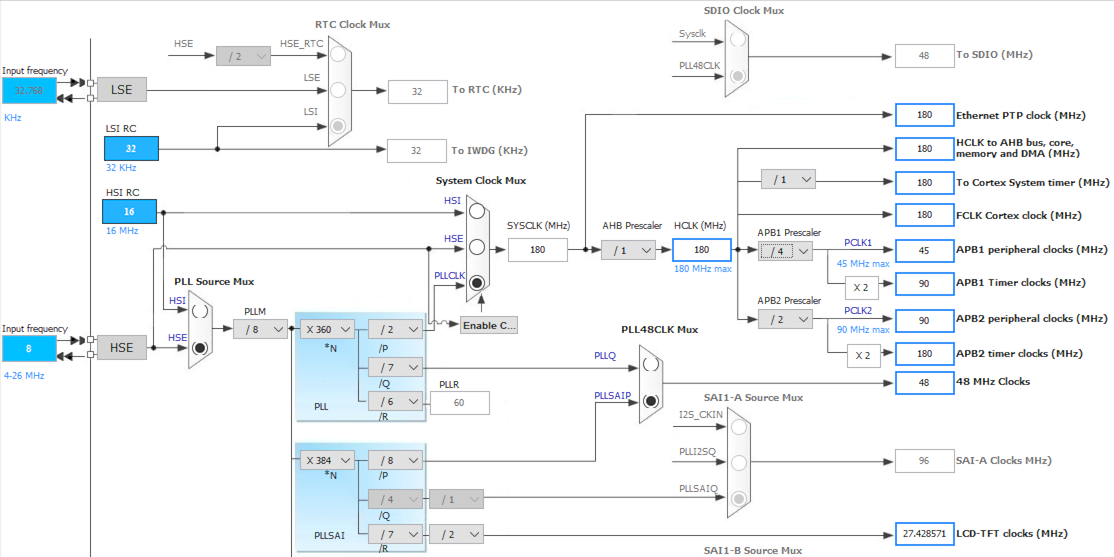
To properly setup the values, we now need to check the speed of the HSE clock on the board. So back to st.com, search for STM32F469-Disco, and from the product page, download the board's user manual UM1932: Discovery kit with STM32F469NI MCU. From chapter "6.3.1 HSE clock source" check that the HSE clock is running at 8MHz.
Now let's check that the run-time is doing the right thing:
- arch/setup_pll.adb is responsible for the clock setup
- gnarl-arch/s-bbpara.ads defines the clock constants
- arch/s-stm32f.ads define some of the MCU's registers, as well as Device ID constants.
Start by adding the STM32F46x device id in s-stm32f.ads. You can search google for the device id, or use st-util to connect to the board and report the id.
DEV_ID_STM32F40xxx : constant := 16#413#;
   DEV_ID_STM32F42xxx : constant := 16#419#;
   DEV_ID_STM32F46xxx : constant := 16#434#;
   DEV_ID_STM32F7xxxx : constant := 16#449#;
Now let's check the clock constants in s-bbpara.ads:
function HSE_Clock
     (Device_ID : STM32F4.Bits_12) return STM32F4.RCC.HSECLK_Range
   is (case Device_ID is
          when STM32F4.DEV_ID_STM32F42xxx => 8_000_000,
          --  STM32F429 Disco board
          when STM32F4.DEV_ID_STM32F7xxxx => 25_000_000,
          --  STM32F7 Evaluation board
          when others => 8_000_000)
          --  STM32F407 Disco board and Unknown device
   with Inline_Always;
We see in s-bbpara.ads that the HSE is OK (we fall in the 'others' case). However the Clock_Frequency constant can be bumped to 180_000_000.
Clock_Frequency : constant := 180_000_000;
   pragma Assert (Clock_Frequency in STM32F4.RCC.SYSCLK_Range);
Looking now at setup_pll.adb, we can verify that this file does not require specific changes. PLLM is set to 8 to achieve a 1 MHz input clock. PLLP is a constant to 2, so PLLN is evaluated to 360 to achieve the expected clock speed : HSE / PLLM * PLLN / PLLP = 180 MHz.
However, the PWR initialization should be amended to handle the STM32F46 case, and can be simplified as we're creating a run-time specific to the MCU:
$ diff -u ../ravenscar-sfp-stm32f4/arch/setup_pll.adb arch/setup_pll.adb
--- ../ravenscar-sfp-stm32f4/arch/setup_pll.adb	2015-04-30 12:36:37.000000000 +0200
+++ arch/setup_pll.adb	2016-01-09 14:11:11.216000000 +0100
@@ -90,7 +90,6 @@
    procedure Initialize_Clocks is

       HSECLK    : constant Integer := Integer (HSE_Clock (MCU_ID.DEV_ID));
-      MCU_ID_Cp : constant MCU_ID_Register := MCU_ID;

       -------------------------------
       -- Compute Clock Frequencies --
@@ -194,11 +193,7 @@
       --  and table 15 p79). On the stm32f4 discovery board, VDD is 3V.
       --  Voltage supply scaling only

-      if MCU_ID_Cp.DEV_ID = DEV_ID_STM32F40xxx then
-         PWR.CR := PWR_CR_VOS_HIGH_407;
-      elsif MCU_ID_Cp.DEV_ID = DEV_ID_STM32F42xxx then
-         PWR.CR := PWR_CR_VOS_HIGH_429;
-      end if;
+      PWR.CR := PWR_CR_VOS_HIGH_429;

       --  Setup internal clock and wait for HSI stabilisation.
       --  The internal high speed clock is always enabled, because it is the
Interrupts
The available interrupts on the MCU can be found in the Reference Manual.
However, an easier and better way to get the list of interrupts is by generating the Ada bindings from the CMSIS-SVD file for this board using the svd2ada tool that can be found on GitHub, and by downloading the SVD file that corresponds to the current MCU (STM32F46_79x.svd) directly from ARM. This binding generates the interrupts list and we can then check the ones that are not mapped by the current run-time.
$ svd2ada ~/SVD_FILES/STM32F46_79x.svd -p STM32_SVD -o temp
$ cat temp/stm32_svd-interrupts.ads
...
...
   UART7_Interrupt: constant Interrupt_ID := 84;

   UART8_Interrupt: constant Interrupt_ID := 85;

   SPI4_Interrupt: constant Interrupt_ID := 86;

   SPI5_Interrupt: constant Interrupt_ID := 87;

   SPI6_Interrupt: constant Interrupt_ID := 88;

   SAI1_Interrupt: constant Interrupt_ID := 89;

   LCD_TFT_Interrupt: constant Interrupt_ID := 90;

   LCD_TFT_1_Interrupt: constant Interrupt_ID := 91;

   DMA2D_Interrupt: constant Interrupt_ID := 92;

   QUADSPI_Interrupt: constant Interrupt_ID := 93;
A total of 91 interrupts are defined by the MCU, with an additional 2 required by GNAT (Interrupt Id 0 is reserved, and GNAT maps the SysTick interrupt to Id 1).
So let's amend the gnarl-arch/a-intnam.ads file:
HASH_RNG_Interrupt               : constant Interrupt_ID := 82;
   FPU_Interrupt                    : constant Interrupt_ID := 83; --  This line and below are new
   UART7_Interrupt                  : constant Interrupt_ID := 84;
   UART8_Interrupt                  : constant Interrupt_ID := 85;
   SPI4_Interrupt                   : constant Interrupt_ID := 86;
   SPI5_Interrupt                   : constant Interrupt_ID := 87;
   SPI6_Interrupt                   : constant Interrupt_ID := 88;
   SAI1_Interrupt                   : constant Interrupt_ID := 89;
   LCD_TFT_Interrupt                : constant Interrupt_ID := 90;
   LCD_TFT_1_Interrupt              : constant Interrupt_ID := 91;
   DMA2D_Interrupt                  : constant Interrupt_ID := 92;
   QUADSPI_Interrupt                : constant Interrupt_ID := 93;

end Ada.Interrupts.Names;
We also need to edit arch/handler.S to properly initialize the interrupt vector:
$ diff -bu ../ravenscar-sfp-stm32f4/arch/handler.S arch/handler.S
--- ../ravenscar-sfp-stm32f4/arch/handler.S	2014-09-15 11:28:25.000000000 +0200
+++ arch/handler.S	2016-01-09 11:58:32.456000000 +0100
@@ -145,6 +145,16 @@
 	.word   __gnat_irq_trap      /* 95 IRQ79.  */
 	.word   __gnat_irq_trap      /* 96 IRQ80.  */
 	.word   __gnat_irq_trap      /* 97 IRQ81.  */
+	.word   __gnat_irq_trap      /* 98 IRQ82.  */
+	.word   __gnat_irq_trap      /* 99 IRQ83.  */
+	.word   __gnat_irq_trap      /* 100 IRQ84.  */
+	.word   __gnat_irq_trap      /* 101 IRQ85.  */
+	.word   __gnat_irq_trap      /* 102 IRQ86.  */
+	.word   __gnat_irq_trap      /* 103 IRQ87.  */
+	.word   __gnat_irq_trap      /* 104 IRQ88.  */
+	.word   __gnat_irq_trap      /* 105 IRQ89.  */
+	.word   __gnat_irq_trap      /* 106 IRQ90.  */
+	.word   __gnat_irq_trap      /* 107 IRQ91.  */

 	.text
And we also need to bump the number of interrupt IDs in gnarl-arch/s-bbpara.ads:
Number_Of_Interrupt_ID : constant := 93;And that's it
The necessary job has now been done to support the STM32F469I-Disco. You can now install the run-time, and use it with the examples from our bareboard drivers repository on GitHub. Note that, as of the time when this article is written, only the 'svd' branch includes some drivers support for this board.
$ gprbuild -P ravenscar_build.gpr
$ cd ~/bareboard/ARM/STMicro/STM32/examples/balls
$ git checkout svd
$ gprbuild -p -P balls_demo.gpr -XBOARD=STM32F469-DISCO -XRTS=ravenscar-sfp -XLCH=lcd -XLOADER=ROM --RTS=ravenscar-sfp-stm32f469disco
$ arm-eabi-objcopy -O binary obj/demo obj/demo.bin
$ st-flash write obj/demo.bin 0x8000000
Porting the run-time to the STM32F7-DISCOVERY
Now on to the STM32F7. This is going to be a bit more difficult for one reason: the STM32F7, being based on the Cortex-M7, can now benefit from Data and Instruction caches. These caches need explicit initialization. A minimal support for the STM32F7 already exists in the run-time, but it is incomplete as these caches are not properly initialized.
Prepare the run-time
First of all, let's create the new run-time for this board. We'll start this time from the work previously performed for the STM32F469-Discovery board to speed up the process.
$ cd ~/gnat/arm-eabi/lib/gnat
$ cp -r ravenscar-sfp-stm32f469disco ravenscar-sfp-stm32f7disco
Enable Data and Instruction caches
Initialization of the cache is described in details by ARM in the Cortex-M7 processor technical reference manual.
So let's try to update the startup code. For that, we're going to add a new file 'arch/start-common.S':
.syntax unified
	.cpu cortex-m4
	.thumb

	.text
	.thumb_func
	.globl	_stm32_start_common
        .type _stm32_start_common, #function
_stm32_start_common:
        /**************/
        /* Enable FPU */
        /**************/

        movw     r0,#0xED88
        movt     r0,#0xE000
        ldr      r1,[r0]
        orr      r1,r1,#(0xF << 20)
        str      r1,[r0]

        /* Wait for store to complete and reset pipeline with FPU enabled  */
        dsb
        isb

        /********************
         * Enable I/D cache *
        ********************/

        /* Register definition for cache handling */
        .set    CCSIDR,  0xE000ED80
        .set    CSSELR,  0xE000ED84
        .set    DCISW,   0xE000EF60
        .set    ICIALLU, 0xE000EF50
        .set    CCR,     0xE000ED14

        /* First invalidate the data cache */
dcache_invalidate:
        mov     r1, #0x0
        ldr     r0, =CSSELR
        str     r1, [r0]        /* Select the data cache size */
        dsb

        ldr     r0, =CCSIDR
        ldr     r2, [r0]        /* Cache size identification */
        and     r1, r2, #0x7    /* Number of words in a cache line */
        add     r7, r1, #0x4

        ubfx    r4, r2, #3, #10  /* r4 = number of ways - 1 of data cache */
        ubfx    r2, r2, #13, #15 /* r2 = number of sets - 1 of data cache */
        clz     r6, r4           /* Calculate bit offset for "way" in DCISW */

        ldr     r0, =DCISW

inv_loop1:
        mov     r1, r4
        lsls    r8, r2, r7

inv_loop2:
        lsls    r3, r1, r6
        orrs    r3, r3, r8

        str     r3, [r0]        /* Invalidate the D-Cache line */
        subs    r1, r1, #1
        bge     inv_loop2
        subs    r2, r2, #1
        bge     inv_loop1

        dsb
        isb

        /* Now invalidate the instruction cache */
icache_invalidate:
        mov     r1, #0x0
        ldr     r0, =ICIALLU
        str     r1, [r0]

        dsb
        isb

        /* Finally enable Instruction and Data cache */
        ldr     r0, =CCR
        ldr     r1, [r0]
        orr     r1, r1, #(0x1 << 16) /* Sets the data cache enabled field */
        orr     r1, r1, #(0x1 << 17) /* Sets the i-cache enabled field */
        str     r1, [r0]

        dsb
        isb

        /*****************************
         * TCM Memory initialisation *
        *****************************/

        .set    CM7_ITCMCR, 0xE000EF90
        .set    CM7_DTCMCR, 0xE000EF94

        ldr     r0, =CM7_ITCMCR
        ldr     r1, [r0]
        orr     r1, r1, #0x1 /* set the EN field */
        str     r1, [r0]

        ldr     r0, =CM7_DTCMCR
        ldr     r1, [r0]
        orr     r1, r1, #0x1 /* set the EN field */
        str     r1, [r0]

        dsb
        isb

end:
        bx lr
        .size _stm32_start_common, . - _stm32_start_common
This file initializes the FPU, the data cache, the instruction cache (according to the ARM documentation), as well as the TCM memory.
We now need to call it from the startup files, start-ram.S and start-rom.S.
start-ram.S:

  /* Init stack */
 	ldr	sp,.LinitSp

-        /* Enable FPU */
-        movw     r0,#0xED88
-        movt     r0,#0xE000
-        ldr      r1,[r0]
-        orr      r1,r1,#(0xF << 20)
-        str      r1,[r0]
-
-        /* Wait for store to complete and reset pipeline with FPU enabled  */
-        dsb
-        isb
+        bl _stm32_start_common

 	/* Clear .bss */
 	movw	r0,#:lower16:__bss_start

start-rom.S:

 _start_rom:
-        /* Enable FPU */
-        movw     r0,#0xED88
-        movt     r0,#0xE000
-        ldr      r1,[r0]
-        orr      r1,r1,#(0xF << 20)
-        str      r1,[r0]
+        bl _stm32_start_common
Clocks, interrupts, linker scripts, etc.
We will also create a linker script for the STM32F7, and add the new board to runtime.xml. We perform the same run-time modifications we did for the STM32F469-Disco board:
create arch/STM32F7-DISCO-memory-map.ld:
MEMORY
{
itcm (x) : ORIGIN = 0x00000000, LENGTH = 16K
flash (rx) : ORIGIN = 0x08000000, LENGTH = 1024K
dtcm (rx) : ORIGIN = 0x20000000, LENGTH = 64K
sram (rwx) : ORIGIN = 0x20010000, LENGTH = 240K
}
In s-stm32f.ads, DEV_ID_STM32F7xxxx is already defined.
In s-bbpara.ads, the HSE clock is also properly set to 25MHz, the MCU can run at 216 MHz, but STM32CubeMX shows some issues with such value, so we simplify by using a 200MHz value.
Now edit runtime.xml:
type Boards is ("STM32F7-DISCO");
Board : Boards := external ("BOARD", "STM32F7-DISCO");
The interrupts are very similar between the STM32F746 and the STM32F469, so you can benefit from the changes already performed.
Et voilà. Now you can rebuild the run-time, and test it similarly to the stm32f469-disco.
$ gprbuild -P ravenscar_build.gpr
$ cd ~/bareboard/ARM/STMicro/STM32/examples/balls
$ gprbuild -p -P balls_demo.gpr -XBOARD=STM32F7-DISCO -XRTS=ravenscar-sfp -XLCH=lcd -XLOADER=ROM --RTS=ravenscar-sfp-stm32f7disco
$ arm-eabi-objcopy -O binary obj/demo obj/demo.bin
$ st-flash write obj/demo.bin 0x8000000
Final words and refinements
You will find below the source files for the runtimes.
Although part of the initial run-time for the STM32F429-Disco is delivered with GNAT, it is not necessarily well optimized (some missing interrupts and a non-optimal clock speed in particular). So I included the sfp and full ravenscar run-times for it as well in the final source packages.
Also, in the attached source package, I made use of extending projects to adjust the runtimes. The setup is a bit complex so I haven't explained it above as this is not really part of the subject, but you can have a look if you want. By using extending projects, the advantage is that I only needed to add the files that I'm actually modifying, and thus can more easily benefit from a futur upgrade of GNAT.
Finally, in the downloadable sources, I got rid of the 'BOARD' scenario variable, as the runtimes are now board specific: such scenario variable is only useful when supporting a complete board family.
To go further in customized run-time, you can refer to the following documentation: Customized run-time.
Attachments
- stm32-rts.tgz - 70.87 kB
About Jérôme Lambourg

Jerome Lambourg is a senior engineer at AdaCore. After graduating from the french High School Telecom ParisTech in 2000, he worked first for Canal+Technologies, and then as a consultant for General Electrics Medical Systems, SAGEM Mobile, and Thales Naval. He then joined AdaCore in 2005. There he worked on various parts of the technology: GPS, GNAT Pro for .NET, AUnit, certification tools (the Qualifying Machine). He is now involved in cross and bare metal platforms, in particular as product manager of GNAT Pro for VxWorks.