
Make with Ada 2020: Disaster Management with Smart Circuit Breaker
by Emma Adby –
Shahariar's project won a finalist prize in the Make with Ada 2019/20 competition. This project was originally posted on Hackster.io here.
Story
Introduction
Miniature Circuit Breaker (MCB) interrupts mains power when a short circuit or over-current occurs. The purpose is safety of electrical system from fire hazard.
A smart circuit breaker will not only function as a regular MCB but also isolates incoming AC mains supply during disaster by sensing earthquake, fire/smoke, gas leakage or flood water. By disconnecting incoming power lines to equipment and power outlets inside house/office/industry during any disaster, it can reduce the chance of electrical hazard and ensuring safety of peoples life and assets.
This system is programmed with Ada, where safety and security is critical.
Demonstration
Hardware and Theory of Operation
Hardware modules
Following parts are connected together to assemble the hardware according to the schematic below :-
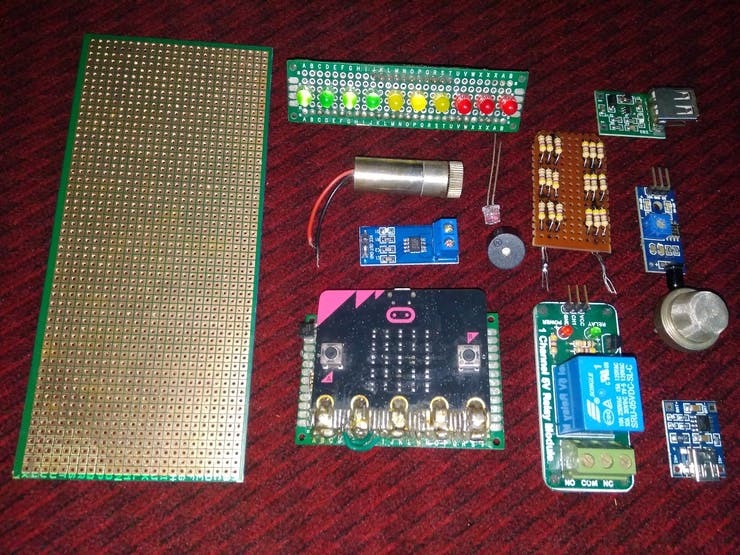
- Microbit: Runs safe firmware written in Ada for the system
- MAA8693 Accelerometer: Earthquake sensing, onboard I2C sensor
- 10 RGY LED Module: Fault Status indication, CC connection
- Buzzer: Fault Alarm beeping and tone generation
- TL431 External Reference: 2.5V reference for ADC measurement
- Laser & Photo Transistor: Smoke Sensing with light interruption
- MQ-5: Natural Gas (CnH2n+2) Leakage Sensor
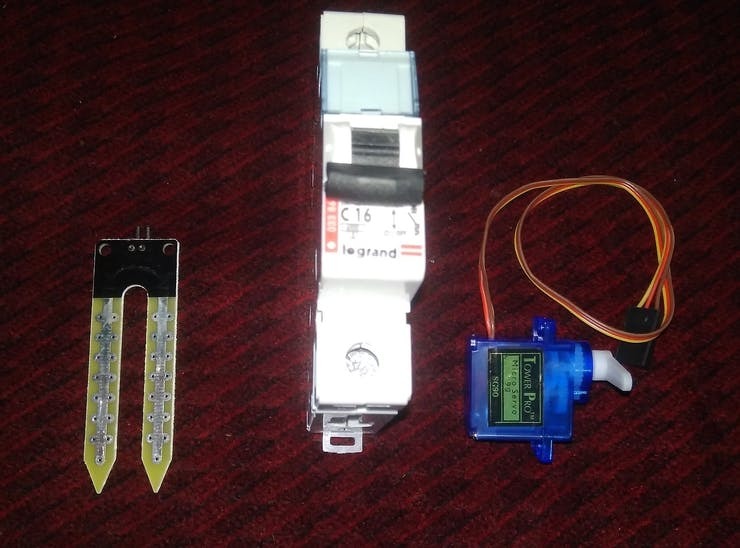
- Flood Sensor: Electrode to detects presence of flood water
- Infrared Flame Sensor: Detects fire break out nearby
- TP4056LiPo Charger Module: Charges up backup battery
- Boost Module: Convert3.0-4.2 V from LiPo to 5.0V DC
- Protoboards: Substrate and interconnection between modules
- Power Supplies: LiPo Battery (backup) and 5V adapter (primary)
- MCB / Relay Module***: Connect/Disconnect mains
- Servo Motor: Trips MCB when smoke/fire/gas/vibration/water sensed
- B & A button: Acknowledge fault and resume normal operation
*** Note: Relay not used but can be used instead of MCB
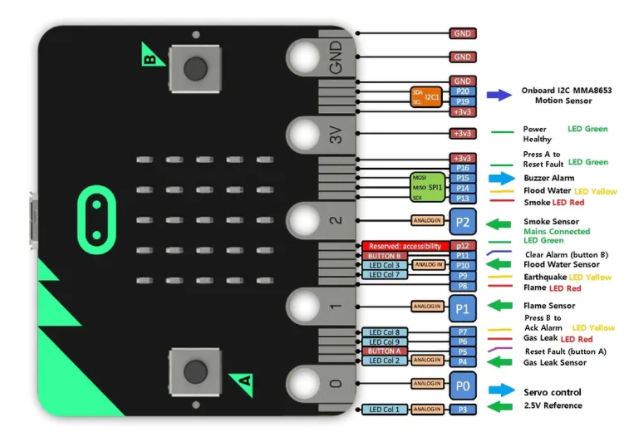
Hardware Pin Map
All the GPIO, ADC, I2C pins are utilized as follows:-
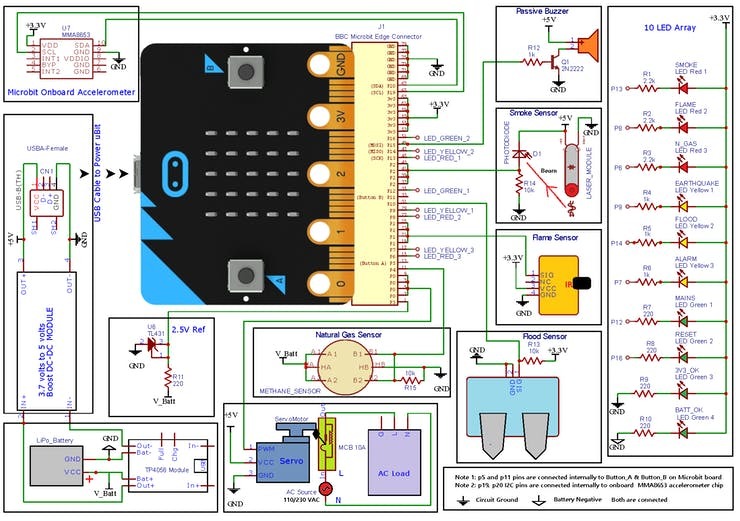
Schematic
Here is the schematic for Smart Circuit Breaker hardware prototype :-
Device Operation
Device operates according to following flowchart :-
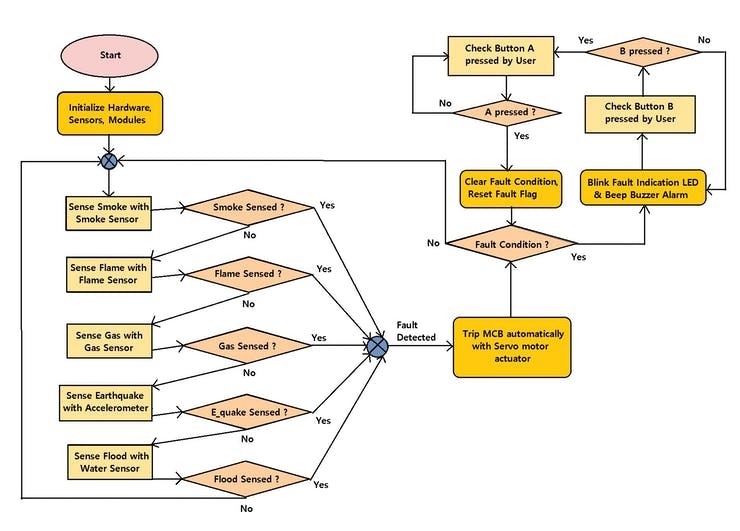
- In Ada code, all the I/Os associated with sensors, modules and indication LEDs are initialized first.
- Next, Smoke, Flame, Natural Gas, Earthquake, Flood sensing happens sequentially until a fault condition is detected.
- Immediately after any fault detection, MCB will be tripped by the servo motor.
- Then, LEDs associated with that of fault keeps blinking and buzzer keeps alarming.
- User needs to press button B to acknowledge fault after taking care of the situation/disaster that triggered the fault in the first place.
- Finally, user will flip the MCB manually to 'On' position and then press A to resume sensing again.
- If a short circuit or over current occurs, MCB will just trip like a regular MCB.
Build
On a piece of protoboard the battery and charger modules are connected and secured with double sided tape and hot glue. This is the bottom layer circuit for powering the rest of the components. Header pins are soldered to carry power to the next layer.

On the second layer (i.e the top one), rest of the sensors, modules and microbit is connected according to the schematic.


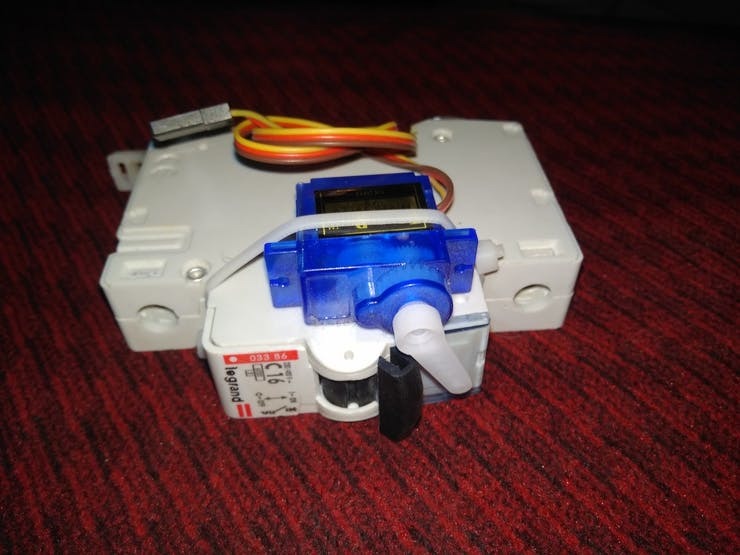
Servo motor is tied with regular circuit breaker with cable tie and connected to the top layer board to get power from the battery & control signal from Micro:bit.
Preparation for Ada programming
- GNAT IDE: download and install GNAT Studio
- ARM Driver: download and install ARM Elf Driver
- Example Codes : https://github.com/AdaCore/Ada_Drivers_Library
Install all of these in the same directory/folder.
Where to start: GNAT Programming Studio
After downloading/installing GNAT IDE, arm driver into the same directory, open example code from:
C:\GNAT\2019\share\gps\templates\microbit_example
Open one of the examples (i.e. digital_out.gpr) for Microbit according to following steps and edit example project code as needed.
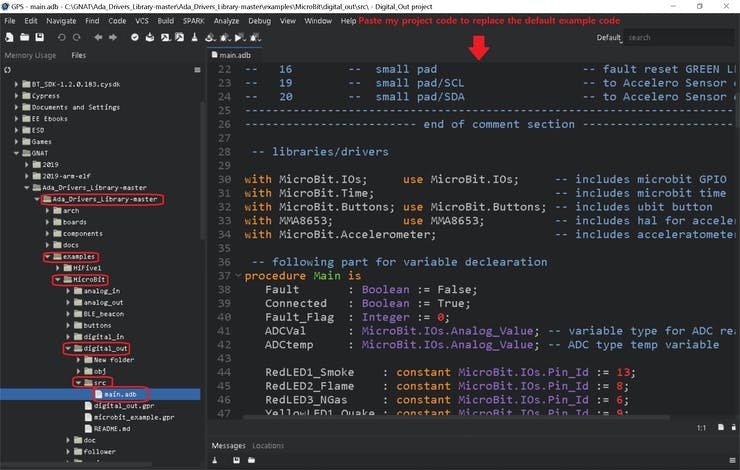
- Step 1: Run GPS (GNAT Programming Studio)
- Step 2: Select digital_out.gpr example project

Step 3: Copy this project's code attached below and replace the example code in main.adb file
Programming in Ada
Following files are the most important files when working with GNAT Studio :-
.gpr file is the GNAT project file for a project
.adb file is the file where Ada code resides (src folder)
.ads files is where the definitions and declarations goes
Code snippets below are taken from the attached code of this project to briefly explain essential Ada programming styles :-
Writing Comments in Ada
Comments/ non executable lines in Ada starts with " -- " like this :-
----------------- edge connector pin mapping ----------------------
-------------------------------------------------------------------
-- See here : https://makecode.microbit.org/device/pins -----------
--  pin(code)   pin (edge connector pads)    hardware connected
--   0         --  large pad 0       -- servo motor control  pin
--   1         --  large pad 1       -- Flame Sense IR module
Anything after -- in a single line is a comment, whereas regular syntax ends with semicolon (;)
Including Packages in Ada
Syntax with "with" keyword is used to add package support to a program. When 'use' keyword is used for that package, it becomes visible/usable in the code
with MicroBit.IOs; use MicroBit.IOs;     -- includes microbit GPIO package
with MicroBit.Time;                      -- includes microbit time package
with MicroBit.Buttons; use MicroBit.Buttons; -- includes button package
with MMA8653;   use MMA8653;          -- includes hal for accelerometer
with MicroBit.Accelerometer;          -- includes acceleratometer package
For example: "with MicroBit.IOs" includes microbit GPIO control support to main.adb code. But including "use MicroBit.IOs" will enable to use variable types from MicroBit.IOs package (see below: Variables in Ada for detailed explanation)
Similarly MMA8653 and MicroBit.Accelerometer enables support for onboard accelerometer chip microbit
Variables/Constants in Ada
Variables are declared in Ada in following format
- Variable_Name : Type := Initial_Value;
- Variable_Name : Type;
Connected is a variable name, which is Boolean Type, it's initial Value is True.
Fault_Flag is a variable name, which is Integer Type and it's initial Value is 0
Connected   : Boolean := True;           -- boolean type variable
Fault_Flag  : Integer := 0;              -- integer type variable
ADCVal      : MicroBit.IOs.Analog_Value; -- variable type for ADC reading
ADCtemp     : MicroBit.IOs.Analog_Value; -- ADC type temp variable
RedLED1_Smoke    : constant MicroBit.IOs.Pin_Id := 13;
RedLED2_Flame    : constant MicroBit.IOs.Pin_Id := 8;
Variable types are 'strict' in Ada.
For example: ADCVal is not 'Integer' type but 'MicroBit.IOs.Analog_Value' type, although it will hold integer numbers between 0 to 1023
Similarly, RedLED1_Smoke has a constant value of 13, but it is not 'Integer' type constant, it is actually 'MicroBit.IOs.Pin_Id' type constant.
To use these odd types of variable like : MicroBit.IOs.Analog_Value and MicroBit.IOs.Pin_Id. coder must include the 'use MicroBit.IOs; ' line of code before variable declaration.
'use' keyword allows programmer to use package specific types of variable.
Ada Main Procedure and Loop
Main procedure in Ada is the main function (equivalent of void main in c), which starts with 'procedure Main is' syntax, then comes the variable declaration. After that the 'begin' keyword begins the main procedure. Below 'begin' is the code which is usually initialization or single run code. Next starts the infinite 'loop' (equivalent of while(1) in c). Finally the 'end loop;' encloses the infinite loop and 'end Main;' ends the main procedure.
Here is the ada code skeleton with comments showing what goes where :-
-- package inclusion goes here

procedure Main is

-- variable declaration goes here

begin

-- initialization or one time executable code goes here

loop

-- body of recurring or looping code goes here

end loop;
end Main;
; (semicolon) is the end of a loop or procedure. There are no use for curly-braces {}
If/else in Ada
In Ada, if-else starts with 'if' keyword followed by logical condition and 'then' keyword, next is the code which will execute if the condition is true, otherwise the code below 'else' will execute. The 'if' statement ends with 'end if;' keyword
if condition_is_true then
   -- do this
    else
    --    do that
end if;
Example :-
if ADCVal >= ADCtemp then
     MicroBit.IOs.Set (RedLED1_Smoke, True); -- Write High to Disble LED
         else
            Fault := True; Fault_Flag := 1;
            Connected := False;
end if;
For Loop in Ada
for tempval in 0 .. 9 loop
MicroBit.IOs.Set(Servo_Pin,True);
MicroBit.Time.Delay_Ms(1);
MicroBit.IOs.Set(Servo_Pin,False);
MicroBit.Time.Delay_Ms(19);
end loop;
Case and null in Ada
Case in Ada starts with 'case' keyword, followed by a variable which will be checked and 'is' keywords. Then it checks matching with 'when' keyword followed by different possible values of the variable and ends with '=>' operator. Next is the code which executes when variable check match with a possible value. 'when other' keyword is for no match condition. Case ends with 'end case;' keyword
'null;' is for doing nothing when no match is found, which needs to be explicitly mentioned.
Nothing is left for guess work in Ada !!!
case variable_name is
    when 1 =>
       -- do this
    when 2 =>
       -- do that
    when others
       null; -- do nothing
end case;
Example :-
case Fault_Flag is
            when 1 =>
            -- smoke fault blinkey
            MicroBit.IOs.Set (RedLED1_Smoke, False);
            MicroBit.Time.Delay_Ms (100);
            MicroBit.IOs.Set (RedLED1_Smoke, True);
            MicroBit.IOs.Set(Buzzer_pin,False);
            MicroBit.Time.Delay_Ms (100);
            when 2 =>
            -- fire fault blinkey
            MicroBit.IOs.Set (RedLED2_Flame, False);
            MicroBit.Time.Delay_Ms (100);
            MicroBit.IOs.Set (RedLED2_Flame, True);
            MicroBit.IOs.Set(Buzzer_pin,False);
            MicroBit.Time.Delay_Ms (100);
            when 3 =>
            -- gas fault blinkey
            MicroBit.IOs.Set (RedLED3_NGas, False);
            MicroBit.Time.Delay_Ms (100);
            MicroBit.IOs.Set (RedLED3_NGas, True);
            MicroBit.IOs.Set(Buzzer_pin,False);
            MicroBit.Time.Delay_Ms (100);
            when 4 =>
            -- earthquake fault blinkey
            MicroBit.IOs.Set (YellowLED1_Quake, False);
            MicroBit.Time.Delay_Ms (100);
            MicroBit.IOs.Set (YellowLED1_Quake, True);
            MicroBit.IOs.Set(Buzzer_pin,False);
            MicroBit.Time.Delay_Ms (100);
            when 5 =>
            -- flood water fault blinkey
            MicroBit.IOs.Set (YellowLED2_Flood, False);
            MicroBit.Time.Delay_Ms (100);
            MicroBit.IOs.Set (YellowLED2_Flood, True);
            MicroBit.IOs.Set(Buzzer_pin,False);
            MicroBit.Time.Delay_Ms (100);
            when others =>
               -- do nothing
               null;
         end case;
Microbit specific APIs
- MicroBit.Time.Delay_Ms (integer) -- delays operation for certain mili seconds
- MicroBit.IOs.Set(Pin_Number, boolean) -- Output drive a GPIO pin
- MicroBit.IOs.Analog(Pin_Number) -- returns a ADC value from an Analog pin
- MicroBit.Buttons.State (Button_Name) = Pressed -- reads A/B buttons
To use these Microbit specific APIs, following packages must be included first:
with MicroBit.IOs;     use MicroBit.IOs;
with MicroBit.Time;
with MicroBit.Buttons; use MicroBit.Buttons;- use MicroBit.IOs enables the use of
MicroBit.IOs.Analog_Valuetype - use MicroBit.Buttons enables the use of
Pressedtype
Examples :-
with MicroBit.IOs;     use MicroBit.IOs;     -- includes microbit GPIO   lib
with MicroBit.Time;                          -- includes microbit timer  lib
with MicroBit.Buttons; use MicroBit.Buttons; -- includes ubit button A/B lib


MicroBit.Time.Delay_Ms(500); -- 500 mS delay

MicroBit.IOs.Set(2, True) -- sets pin 2 Logic-High
MicroBit.IOs.Set(1, False) -- sets pin 1 Logic-Low

ADCVal : MicroBit.IOs.Analog_Value; -- analog_value type variable,not an int
ADCVal:= MicroBit.IOs.Analog(0) -- returns a value between 0 to 1023

MicroBit.Buttons.State (Button_A) = Pressed -- returns True is A is pressed
Uploading Code
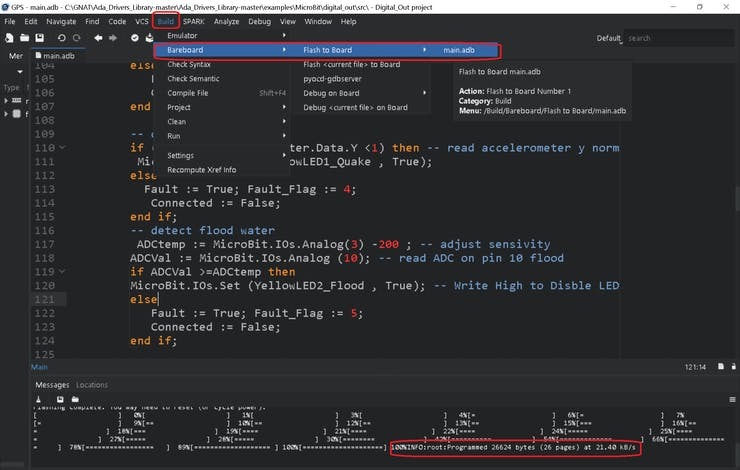
Once the editing of the code is done, connect Microbit to computer with USB cable ( Windows will make ding-dong sound ).
Then click : Build > Bareboard > Flash to Board > main.adbto flash code to Microbit. The Message window below will show code size and upload percent.
If upload problem occurs, check USB cable or reinstall pyOCD.
Ada Programming: Where Ada shines ?
Ada isn't just another programming language. It shines where Safety, Security and Reliability matters. In systems where a hidden firmware/software bug could be fatal, life-threatening or damage of equipment might cause huge economic loss, those are the kind of systems where Ada can make a huge difference.
For example, embedded system used in:-
Pacemaker&ICU Medical EquipmentSelf Driving VehiclesExplosive IgniterMissile Guidance & Para-suite LauncherSpaceship Life Support SystemLift ControlFire Alarm & SafetyAutomated SecurityEnterprise Server Power MonitoringFail Safe Mechanism MonitoringPower Plant Steam GenerationRadioactivity MonitoringChemical Process ControlSafety Critical Consumer Electronics (e.g. Induction Cooker)
How Ada makes system safe and secure ?
Ada compiler is very strict, it will keep bashing the coder/programmer with errors, warning, suggestions until a clear, well thought code is produced.
Well, compilers in other programming languages do that, too ! But the difference is, things that are not even an error in other programming language is an error in Ada. Someone coming from C or Arduino Land will feel the punch. For example - when trying to add float with integer. In Ada, Apple does not add up with Banana.
“think first, code later” - is the principle which Ada promotes !
Programmer must think clearly about the impact of each type/variable and code in a proper manner. There are other differences like writing style, operators.
Practical Design Considerations
This prototype is designed in a way, so that all the functions can be demonstrated easily. But for practical use, following actions are recommended:
- Both Smoke and Flame sensor are sensitive to strong light, therefore proper shielding from direct light is recommended
- Flood sensor should be placed near floor, where it can easily detect indoor flood water
- Earthquake sensor is susceptible to vibrations, that is why Smart MCB should be mounted on rigid structure
- Gas sensor requires 24 hrs break in period for proper operation
- Proper PCB and enclosure is necessary for hardware reliability
References
- Ada Driver Library and Example code for Microbit on GitHub
- Ada for the C++ or Java Developer
- Ada Keywords
- GNAT IDE and Drivers
Conclusion
As I have already said, this is just a prototype hardware which I made with my limited resources. But Smart MCB is exactly the kind of application (safety critical) for which the spirit of Ada programming is intended.
MCB was invented and patented by Hugo Stotz almost 100 years ago. I wish someone out there can turn this project into a real product and upgrade the century old MCB technology into Smart MCB for improved safety of next generation electrical distribution systems.
About Emma Adby

Emma Adby is the Managing Director of AdaCore Ltd. After co-leading the global marketing team for a number of years, she now manages marketing, financial, legal and HR business operations for AdaCore’s new UK technical centre-of-excellence. Emma also works to advocate for increased adoption and wider use of the Ada and SPARK languages globally by coordinating community centric activities and resources.