Introduction to Ada: a project-based exploration with rosettas
by Romain Gora –
Context
This practical walkthrough, designed as a short tutorial, was created upon joining AdaCore as a Field Engineer. In this new role, I’ll be working directly with customers to help them succeed with Ada. Although I was first introduced to the language nearly two decades ago, this new position inspired me to revisit its fundamentals, and I used the excellent https://learn.adacore.com portal as a quick refresher.
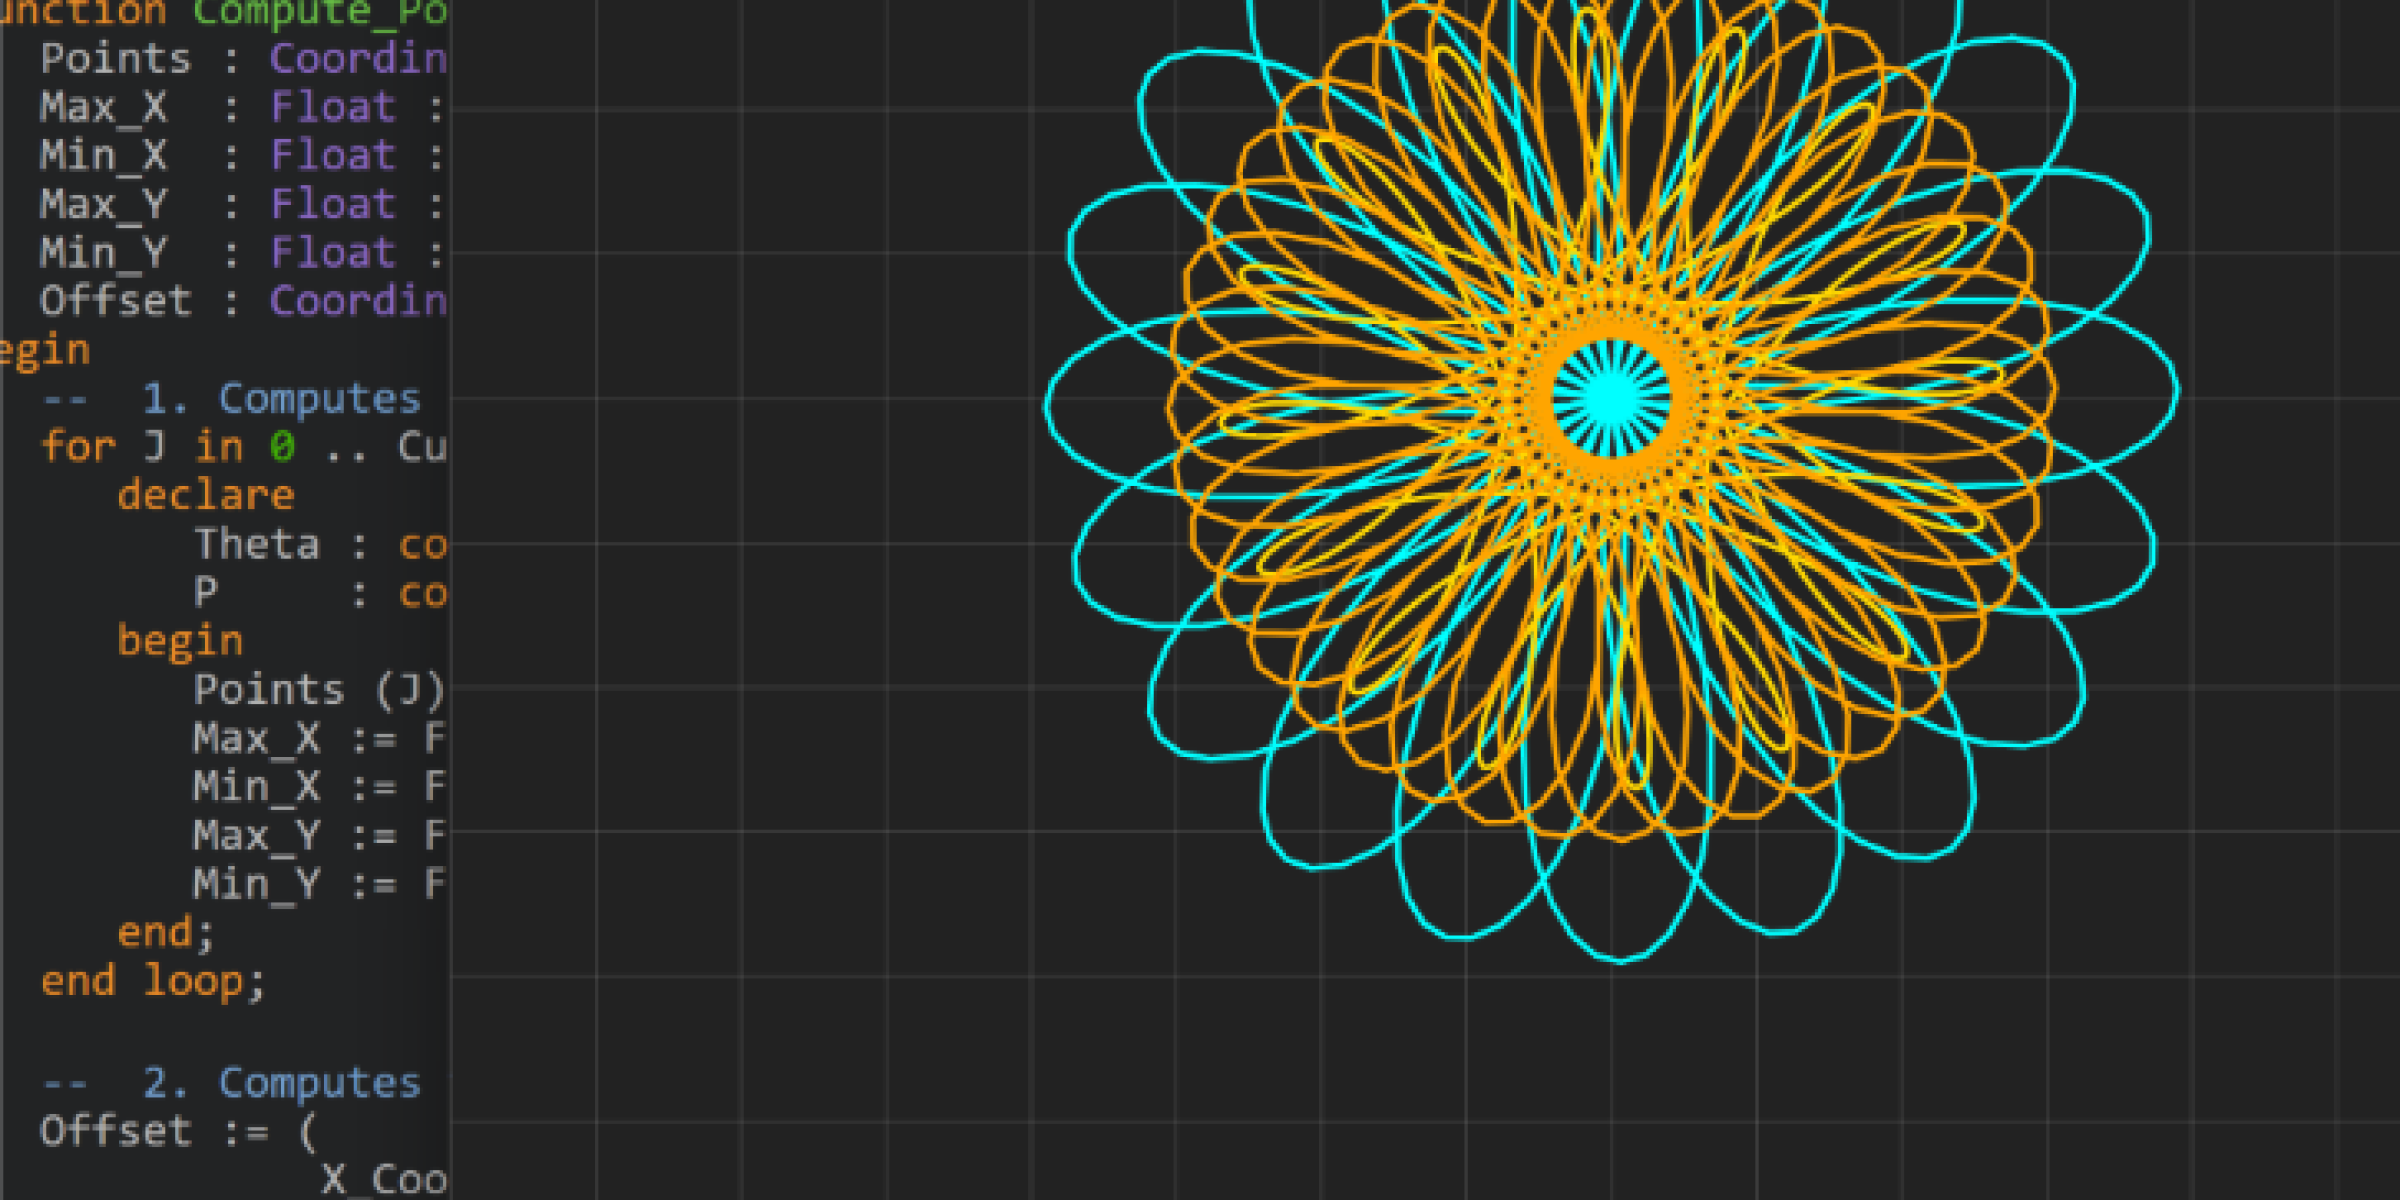
While that platform takes a concept-based approach, I chose to complement it with a project-based method by developing a small, end-to-end Ada program that generates animated rosettas in the form of SVG files. These are technically hypotrochoid curves, producing patterns that many will recognize from the classic Spirograph™ toy.
In this walkthrough, we’ll show that Ada can be fun and easy to learn. Although the language is famous for safety-critical systems, we will use it as a modern, general-purpose programming language and try out some new features from Ada 2022 along the way.
Let's dive in!
A brief note on Ada
This section leans a bit more into background context, with a slightly encyclopedic flavor that's especially useful for readers new to Ada. If you're already familiar with Ada’s history and principles, feel free to joyfully skip ahead to the next section!
Ada was created in the late 1970s after a call from the U.S. Department of Defense to unify its fragmented software landscape. The winning proposal became Ada, a language that's been literally battle-tested (!) and built on a deeply thought-out design that continues to evolve today.
While Ada is absolutely a general-purpose programming language, it has carved out a strong niche in fields where software correctness and reliability are mission-critical:
Embedded and real-time systems
Aerospace and defense
Rail, automotive, and aviation
Any system where failure is not just a bug, but a risk
Its strict compile-time checks, safety features, and clear structure make it particularly appealing when you need your software to be dependable from day one and still maintainable ten years later.
Ada's design is grounded in a strong and principled philosophy:
Readability over conciseness: Ada favors clarity. It avoids symbols and abbreviations in favor of full keywords, making the language more accessible and less error-prone.
Strong and explicit typing: It is extremely easy to declare new types in Ada, with precise constraints, which makes it much harder to accidentally misuse data. While some functional languages share this strong typing discipline, Ada stands out by requiring the programmer to be very explicit. It uses little to no type inference.
Explicit is better than implicit: Unlike many modern languages that prioritize convenience, Ada leans heavily toward precision. Most types must be explicitly named and matched.
Defined semantics and minimal undefined behavior: Ada offers a level of predictability and safety unmatched in many languages. This makes it a strong choice not only for safety-critical systems, but also for codebases where long-term maintenance, verifiability, and correctness are essential.
Compiler as a partner: Ada compilers are strict by design, not to frustrate, but to help the programmer write clearer, more correct code. This philosophy encourages the developer to communicate intent clearly, both to the compiler and to future readers.
How the program works
Sometimes the best way to figure out how something works is to start at the end. Let's do that!
In this tutorial, we'll walk through how the program produces its final output — a rosetta SVG file — and use that as a way to explore how Ada's structure, type system, and tooling come together.
This is a simple command-line program that generates an SVG file. You run it like this:
./bin/rosetta
The idea was to create something visual: learning is more fun when there's an immediate, satisfying result and generating rosettas fits that goal perfectly.
Why SVG? Because it's a lightweight and portable vector format that you can view in any modern browser. I wanted to avoid relying on a graphical library, which would have added extra weight and gone beyond the scope of this approach. And while XML isn't the most pleasant format to write by hand, generating it from code is straightforward and gives a surprisingly clean result.
Tooling & setup
To build and run the project, I used Alire, the Ada package manager. It plays a similar role in the Ada ecosystem as Cargo does for Rust or npm for JavaScript. It's well-documented, and while we won't dive deep into it here, it's a solid and accessible way to manage Ada projects. I encourage anyone curious to get it from https://alire.ada.dev. Interestingly, "Alire" is also the French expression for "à lire" — which means "for reading." A fitting name for a tool that supports a language so focused on clarity and readability!
Once Alire is set up, the natural next step is choosing where to write the code. You have two excellent options for your development environment. For a dedicated experience, you can download the latest release of GNAT Studio from its GitHub repository. If you prefer a more general-purpose editor, you can install the official Ada & SPARK for Visual Studio Code extension from AdaCore.
As a new learner, I also kept https://learn.adacore.com close at hand. It’s a particularly clear and comprehensive resource — and I especially appreciated being able to download the ebook version and read through it on my phone.
Entry point
with Rosetta_Renderer;

procedure Main is
begin
   Rosetta_Renderer.Put_SVG_Rosettas;
end Main;
There are several interesting things to notice right away:
The
withclause is not a preprocessor directive like in C or C++. It’s a compiled, checked reference to another package — a reliable and explicit way to express a dependency. This eliminates entire classes of bugs related to fragile#includechains, macro collisions, or dependency order issues.This
procedureis not afunction: it does not return a value. In Ada, procedures are used to perform actions (like printing or modifying state), and functions are used to compute and query values.The syntax is designed for readability. You’ll find
beginandendhere instead of{}as in C/C++, reinforcing Ada’s philosophy that clarity matters more than brevity.Put_SVG_Rosettasuses the idiomatic Pascal_Snake_Case naming style. This reflects a common Ada convention and avoids acronyms or compressed identifiers in favor of more descriptive names.The entry point is minimal but meaningful: it simply calls a procedure which generates the output we'll explore in the next sections.
Geometry and computation (package Rosetta)
In Ada, a package is a modular unit that groups related types, procedures, and functions. Following the convention from GNAT (the Ada compiler, part of the GNU Compiler Collection, fondly known as GCC), each package has a specification file (with the .ads extension — short for Ada Specification) and an implementation file (with the .adb extension — short for Ada Body). This clear and enforced split means you always know where to find interface definitions versus their implementation.
The following code is the package specification for Rosetta. It defines the data types for the rosetta shapes and declares the public interface of operations available to manipulate them.
with Ada.Strings.Text_Buffers;

package Rosetta is

   --  A mathematical description of a rosetta (specifically, a hypotrochoid).
   --  formed by tracing a point attached to a circle rolling inside another circle.
   type Hypotrochoid is record
      Outer_Radius : Float;     --  Radius of the fixed outer circle.
      Inner_Radius : Float;     --  Radius of the rolling inner circle.
      Pen_Offset   : Float;     --  From the center of the inner circle to the drawing point.
      Steps        : Positive;  --  Number of steps (points) used to approximate the curve.
   end record;

   --  A 2D coordinate in Cartesian space.
   type Coordinate is record
      X_Coord, Y_Coord : Float;
   end record
     with Put_Image => Put_Image_Coordinate;

   --  Redefines the 'Image attribute for Coordinate.
   procedure Put_Image_Coordinate
     (Output : in out Ada.Strings.Text_Buffers.Root_Buffer_Type'Class;
      Value  : Coordinate);

   --  A type for an unconstrained array of 2D points forming a curve.
   --  The actual bounds are set when an array object of this type is declared.
   type Coordinate_Array is array (Natural range <>) of Coordinate;

   --  Computes the coordinates of the rosetta curve defined by Curve (a hypotrochoid).
   --  Returns a centered array of coordinates.
   function Compute_Points (Curve : Hypotrochoid) return Coordinate_Array;

end Rosetta;
The Rosetta package is responsible for all the math and curve computation. It defines:
Hypotrochoid, type describing the geometry of the rosettaCoordinate, type representing points in 2D spaceCoordinate_Array, type holding a series of such pointsCompute_Points, function which calculates all the points of the curve based on theHypotrochoidparameters and recenters them around the origin
This package is focused solely on computation. It doesn’t concern itself with how the result is rendered.
Fun fact for the curious: when the rolling circle rolls outside the fixed circle rather than inside, the resulting curve is called an epitrochoid.
In Ada, a record is similar to a struct in C or a class with only data members in other languages. It's a user-defined type composed of named components, making it ideal for modeling structured data.
Using a record for Hypotrochoid was particularly appropriate: it allows grouping all geometric parameters (outer radius, inner radius, pen offset, and steps) into a single, cohesive unit. This improves readability and maintainability. The compiler enforces correctness by ensuring all required values are present and of the expected type — reinforcing Ada’s philosophy of clarity and safety.
The type Coordinate_Array is an unconstrained array type that holds a range of Coordinate records. In this context, ‘unconstrained’ simply means that we don’t define the array’s size when we declare the type. Instead, the size is defined when we declare an object of that type. This gives us the flexibility to use this type for a variety of shapes.
You may also notice the use of Natural range <>. Natural is a predefined subtype of Integer that only allows non-negative values. And yes, I mean subtype: Ada’s powerful type system allows you to take an existing type and create a more specific, constrained version of it.
Highlights from the .adb file
Here are a few notable aspects from the implementation (rosetta.adb) that illustrate Ada’s strengths for writing safe, clear, and structured code:
Declarative and modular design: Both
Generate_PointandCompute_Pointsare pure functions that operate only on their inputs. Their behavior is fully deterministic and encapsulated.Safe bounds and array handling: The
Pointsarray is statically bounded using(0 .. Curve.Steps), and its access is strictly safe. The compiler ensures that any index outside this range would raise an error at runtime. This immediate error is a feature, not a bug. It stops silent memory corruption and security flaws by ensuring the program fails predictably and safely at the source of the problem.Use of constants for robustness: Variables such as
Pi,R_Diff, and Ratio are declared as constant, enforcing immutability. This helps ensure clarity of intent and prevents accidental reassignment, a common source of subtle bugs in more permissive languages. Ada encourages this explicit declaration style, promoting safer code.
with Ada.Numerics;
with Ada.Numerics.Elementary_Functions;

use Ada.Numerics;
use Ada.Numerics.Elementary_Functions;

package body Rosetta is

   --  Computes a single point on the hypotrochoid curve for a given angle Theta.
   --  Uses the standard parametric equation of a hypotrochoid.
   function Generate_Point (Curve : Hypotrochoid; Theta : Float) return Coordinate is
      R_Diff : constant Float := Curve.Outer_Radius - Curve.Inner_Radius;
      Ratio  : constant Float := R_Diff / Curve.Inner_Radius;
   begin
      return (
              X_Coord => R_Diff * Cos (Theta) + Curve.Pen_Offset * Cos (Ratio * Theta),
              Y_Coord => R_Diff * Sin (Theta) - Curve.Pen_Offset * Sin (Ratio * Theta)
             );
   end Generate_Point;

   --  Computes all the points of the hypotrochoid curve and recenters them.
   --  The result is an array of coordinates centered around the origin.
   function Compute_Points (Curve : Hypotrochoid) return Coordinate_Array is
      Points : Coordinate_Array (0 .. Curve.Steps);
      Max_X  : Float := Float'First;
      Min_X  : Float := Float'Last;
      Max_Y  : Float := Float'First;
      Min_Y  : Float := Float'Last;
      Offset : Coordinate;
   begin
      --  Computes raw points and updates the bounding box extents.
      for J in 0 .. Curve.Steps loop
         declare
            Theta : constant Float := 2.0 * Pi * Float (J) / Float (Curve.Steps) * 50.0;
            P     : constant Coordinate := Generate_Point (Curve, Theta);
         begin
            Points (J) := P;
            Max_X := Float'Max (Max_X, P.X_Coord);
            Min_X := Float'Min (Min_X, P.X_Coord);
            Max_Y := Float'Max (Max_Y, P.Y_Coord);
            Min_Y := Float'Min (Min_Y, P.Y_Coord);
         end;
      end loop;

      --  Computes the center offset based on the bounding box.
      Offset := (
                 X_Coord => (Max_X + Min_X) / 2.0,
                 Y_Coord => (Max_Y + Min_Y) / 2.0
                );

      --  Recenters all points by subtracting the center offset.
      for J in Points'Range loop
         Points (J).X_Coord := @ - Offset.X_Coord;
         Points (J).Y_Coord := @ - Offset.Y_Coord;
      end loop;

      return Points;
   end Compute_Points;

   --  Redefines the 'Image attribute for Coordinate.
   procedure Put_Image_Coordinate
     (Output : in out Ada.Strings.Text_Buffers.Root_Buffer_Type'Class;
      Value  : Coordinate)
   is
      X_Text : constant String := Float'Image (Value.X_Coord);
      Y_Text : constant String := Float'Image (Value.Y_Coord);
   begin
      Output.Put (X_Text & "," & Y_Text);
   end Put_Image_Coordinate;

end Rosetta;
On style: strict and predictable (and satisfying!)
Ada is one of those rare languages that not only compiles your code but asks you to write it properly. With the compiler switch -gnaty, you can enforce a comprehensive set of style rules, many of which are stricter than what you'd see in most languages.
This includes things like:
No trailing whitespace at the end of lines
No consecutive blank lines
Proper indentation and alignment of keywords and parameters
A space before “(“ when calling a procedure or function
Consistent casing
At first, this can feel surprisingly strict. But once you get used to it, the benefits are clear: it helps enforce a consistent and clean coding style across a codebase. That in turn improves readability, reduces ambiguity, and leads to more maintainable programs.
Rather than leaving formatting up to personal taste or optional linter tools, Ada integrates this attention to detail into the compilation process itself. The result is not only more elegant: it's genuinely satisfying. And you can do even more with GNATcheck and GNATformat but it’s outside of the scope of this post.
Outputting to SVG (package Rosetta_Renderer)
The Rosetta_Renderer package is responsible for producing the SVG output. It defines a single high-level procedure:
package Rosetta_Renderer is

   --  Renders a predefined set of rosettas into an SVG output.
   procedure Put_SVG_Rosettas;

end Rosetta_Renderer;
This procedure generates an SVG file directly. It takes care of formatting the SVG structure (header, shapes, animations, and footer) and calls into the math logic defined in the Rosetta package to generate point data.
This separation of concerns is deliberate and beneficial: the math logic doesn’t need to know anything about SVG, and the renderer doesn’t care how the coordinates were generated.
Now let's talk about the body of the package... but not for long. We're keeping it brief because its core is essentially the SVG plumbing required to draw and animate the curves, so we'll skip the fine details. And for those who enjoy seeing how the sausage is made, I've made the fully commented source code available for you right here.
The procedure Put_Path handles the creation of the SVG path. Its main job is to take an array of coordinates and write the corresponding command string to the d attribute of a <path> element. In SVG, this attribute defines the geometry of the shape. The code iterates over each coordinate, using M (moveto) for the first point and L (lineto) for all the others to draw the connecting lines.
--  Puts coordinates to a single SVG path string ("d" attribute).
   procedure Put_Path (Stream : File_Type; Points : Coordinate_Array) is
   begin
      Put (Stream, "M "); -- Moves the pen without drawing.
      for J in Points'Range loop
         declare
            Coord_Text : constant String := Coordinate'Image (Points (J));
         begin
            Put (Stream, Coord_Text);
            if J < Points'Last then
               Put (Stream, " L "); --  Draws a line.
            end if;
         end;
      end loop;
   end Put_Path;
Afterword
This small project was an enjoyable and useful way to get back into Ada. It helped me reconnect with the language’s main strengths and refamiliarize myself with its tools and design. It was a great reminder of how fun, easy to learn, and remarkably modern Ada can be, especially for developers focused on building robust, maintainable, and efficient software.
I hope this short walkthrough gives a good idea of that feeling, whether you're already into Ada or just starting to explore it.
About Romain Gora

Romain joined the Field Engineering team at AdaCore in Paris in 2025, a role focused on empowering our customers to unlock the full potential of our technology, bringing over two decades of software development experience from the video game industry and his work as a startup co-founder.
With a background covering a wide array of programming languages and technologies, he enjoys deepening his expertise in Ada and Rust to help build software that matters.