Ada GameDev Part 3: Enjoy Video Games Programming with Raylib
by Fabien Chouteau –
In April 2024 a streamer named Tsoding developed a video game from start to finish in Ada in 20 days. He seemed to have enjoyed the experience, to the point where he says that Ada will be the next trendy programming language for game development. Ignoring the potential irony in the streamer’s comment, I thought let’s give Ada gamedev a little push in that direction.
Tsoding is using one library for his game, Raylib, which I have had on my radar for a long time. Raylib is written in C and is described as a “simple and easy-to-use library to enjoy video games programming”. It’s minimalistic, portable, and provides easy ways to do complex things.
Raylib is quite popular, and bindings for many different languages are already available. One reason for this is the quite clever API documentation based on a tool that parses the C headers of the implementation. This tool generates a JSON file that describes all the constants, structs, enums, callbacks, and functions of Raylib. It’s therefore relatively simple to generate bindings from the JSON file.
This is the approach I used for my bindings. And although the script I wrote is fairly clumsy, I am confident that it will allow easier maintenance of the bindings in the future.
Getting Started with Raylib in Ada
This Raylib binding is available in the Alire package manager. Here are the few first steps to get started:
Create and Alire project: alr init --bin my_first_ada_game (Alire will ask you a few questions to create the project)
Add the Raylib Ada bindings in your dependencies: alr with raylib
Link with Raylib and libm in the GPR file:
package Linker is
   for Switches ("Ada") use ("-lm", "-lraylib");
end Linker;
If you are on Windows (msys2), macOS, or most Linux distributions, Alire will install the Raylib library itself from the system package manager. However on Ubuntu/Debian, Raylib is not available in the system package manager, therefore you have to install it yourself.
In this case, you can use the following commands to download Raylib for x64_64 Linux and set the required environment variables:
$ wget https://github.com/raysan5/raylib/releases/download/5.0/raylib-5.0_linux_amd64.tar.gz
$ tar xf raylib-5.0_linux_amd64.tar.gz
$ export C_INCLUDE_PATH=${PWD}/raylib-5.0_linux_amd64/include/:${C_INCLUDE_PATH}
$ export LIBRARY_PATH=${PWD}/raylib-5.0_linux_amd64/lib/:${LIBRARY_PATH}
You should be good to go in terms of setup.
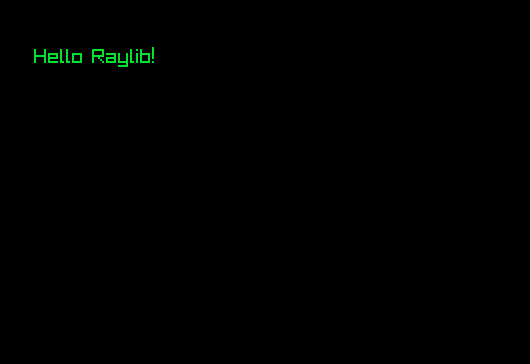
Now you can write a first render loop in src/my_first_ada_game.adb:
with Raylib; use Raylib;

procedure My_First_Ada_Game is
begin
   InitWindow (800, 600, "My First Ada Game");
   loop
      BeginDrawing;
      DrawText ("Hello Raylib!", 0, 0, 20, GREEN);
      EndDrawing;
      exit when WindowShouldClose;
   end loop;
   CloseWindow;
end My_First_Ada_Game;
Compile and run, you should see a black window with a green “Hello Raylib!” text.
Here’s a quick explanation of what is going on:
InitWindow: Create a window in the host operating system with the given resolution and title.
BeginDrawing: Call this procedure to tell Raylib that you are starting to draw things on the window.
DrawText: draw a piece of text within the window with position, size, and color.
EndDrawing: Call this procedure to tell Raylib that you have finished drawing on the window.
exit when WindowShouldClose: The WindowShouldClose function is defined in the Raylib package and returns true when the user presses the escape key (by default), in which case we exit the loop.
CloseWindow: close the window and release resources.
And that’s it, only a couple of lines to start. You can now explore the other Raylib drawing functions (DrawLine, DrawCircle, DrawRectangle, etc.), you can load image files and draw them on the window as well.
Let’s add a dimension
Now that we know how to draw in 2 dimensions, let’s move to 3D!
with Raylib; use Raylib;

procedure My_First_Ada_Game is
   Cam : aliased Camera3D := (position   => (10.0, 10.0, 10.0),
                              target     => (0.0, 0.0, 0.0),
                              up         => (0.0, 1.0, 0.0),
                              fovy       => 45.0,
                              projection => CAMERA_PERSPECTIVE);
begin
   InitWindow (800, 600, "My First 3D Ada Game");
   DisableCursor;
   loop
      UpdateCamera (Cam'Access, CAMERA_FIRST_PERSON);

      BeginDrawing;
      ClearBackground (WHITE);
      BeginMode3D (Cam);
      DrawCube ((0.0, 0.0, 0.0), 2.0, 2.0, 2.0, RED);
      DrawGrid (10, 1.0);
      EndMode3D;
      EndDrawing;
      exit when WindowShouldClose;
   end loop;
   CloseWindow;

end My_First_Ada_Game;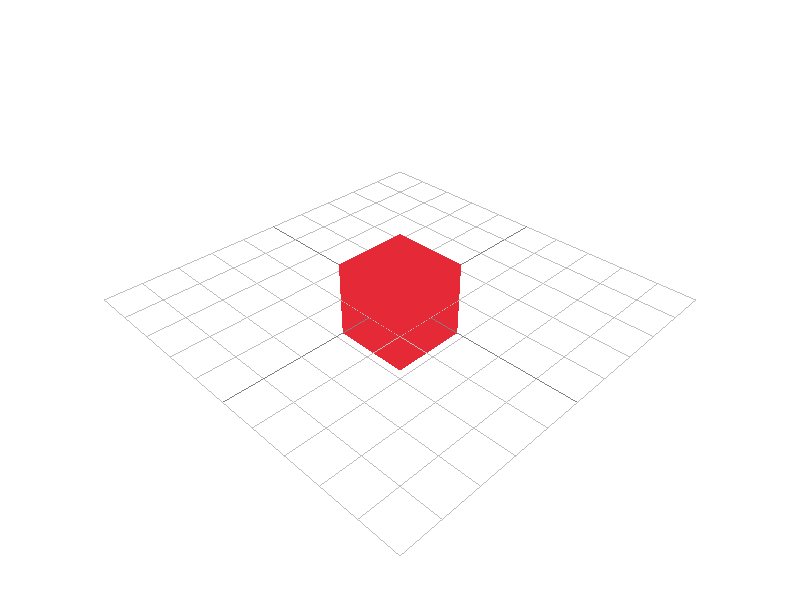
Here are the new elements compared to the 2D example:
Cam : aliased Camera3D := … : For 3D rendering we need a camera in the 3D space.
DisableCursor: The mouse cursor is not needed for this 3D example, so we disable it.
UpdateCamera: Raylib provides a convenient procedure to handle common camera movement. Here we use the “first person” mode where you can look around with the mouse and move with W, A, S, D keys.
ClearBackground: At the beginning of the drawing sequence, we fill the window in white.
BeginMode3D (Cam): This is similar to BeginDrawing but for 3D rendering. Note that you still have to call BeginDrawing before BeginMode3D.
DrawCube and DrawGrid: Basic 3D drawing subprograms, there are a few more available in Raylib and you can also load 3D models from files and draw them.
EndMode3D: Equivalent to EndDrawing for 3D mode.
If you ever tried to write 3D rendering before, you might appreciate how easy it is to start with Raylib.
A little bit of user interface
Raylib also comes with a basic Graphical User Interface (GUI) framework, nicknamed RayGUI. RayGUI is an immediate-mode gui, which means there is no data structure to describe the interface and its state, but a set of functions to draw the widgets on screen every frame.
Here’s a small example:
with Raylib;   	use Raylib;
with Raylib.GUI;   use Raylib.GUI;
with Interfaces.C; use Interfaces.C;

procedure My_First_Ada_Game is
   Pressed : Boolean := False;
begin
   InitWindow (800, 600, "My First Ada Game");
   loop
      BeginDrawing;
      ClearBackground (BLACK);
      if GuiButton ((0.0, 0.0, 100.0, 50.0), "This is a button!") /= 0 then
         Pressed := True;
      end if;
      DrawText ("Pressed:" & Pressed'Img, 0, 100, 10, GREEN);
      EndDrawing;
      exit when WindowShouldClose;
   end loop;
   CloseWindow;
end My_First_Ada_Game;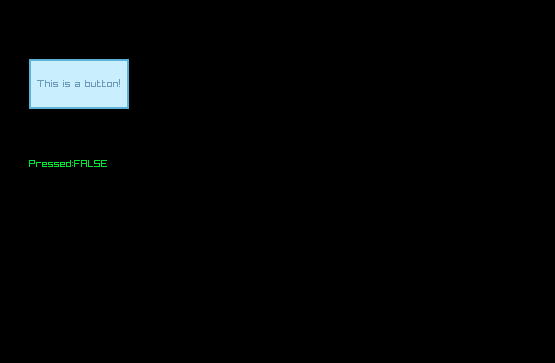
The only difference compared to our first 2D example is the call to GuiButton. This function will both draw a button widget on screen and also return its state (i.e. button pressed or not). All RayGUI “widgets” follow this principle.
Tips for the next steps
My goal here is not to do a full Ada Raylib tutorial, but give you the first steps to get started.
Here are a few tips to help you go further:
The Raylib examples page is a great resource to explore Raylib features. If you click on the example you will see the corresponding C code which is usually relatively easily translatable to Ada.
Load/Unload function: Raylib functions with the prefix “Load” allocate resources. Use the corresponding “Unload” functions to release those resources.
Subprograms with string arguments are provided in two variants. One takes a C string (i.e. pointer to nul-terminated array of char), another one takes a standard Ada String type that is then automatically converted to a C string.
About Fabien Chouteau

Fabien joined AdaCore in 2010 after his engineering degree at the EPITA (Paris). He is involved in real-time, embedded and hardware simulation technology. Maker/DIYer in his spare time, his projects include electronics, music and woodworking.