Ada GameDev Part 1: GEneric Sprite and Tile Engine (GESTE)
by Fabien Chouteau –
Today I am starting a series of blog posts about video game development with Ada.
Video games are what first drew me to programming and computer science. As far as I remember, my first ever programming experience was scripting my own maps in the first Medal Of Honor PC game. But except for a couple of "rush" projects during my studies, I actually did not make a lot of games. So a couple of years ago I started a journey back to my early programming experience and began to develop some games and game development frameworks in Ada. In this series I will present some of these projects and how you can use them to make your own games in Ada.
Although this is the first post in the series, an earlier project of mine could be considered my first video game in Ada. In 2015, I wrote a post about my interactive Apollo 11 moon landing simulator. This is effectively a video game in which only the most talented pilots will be able to land safely on the moon. This game is made with gtkada, and you can now try it from the Alire package manager:
$ alr get eagle_lander
$ cd eagle_lander*
$ alr run
GESTE
In this first entry of the series, I want to present my GEneric Sprite and Tile Engine (GESTE) project. The goal of GESTE is to bring the rendering and aesthetic of 8bit era game consoles to modern microcontrollers.
Picture Processing Unit
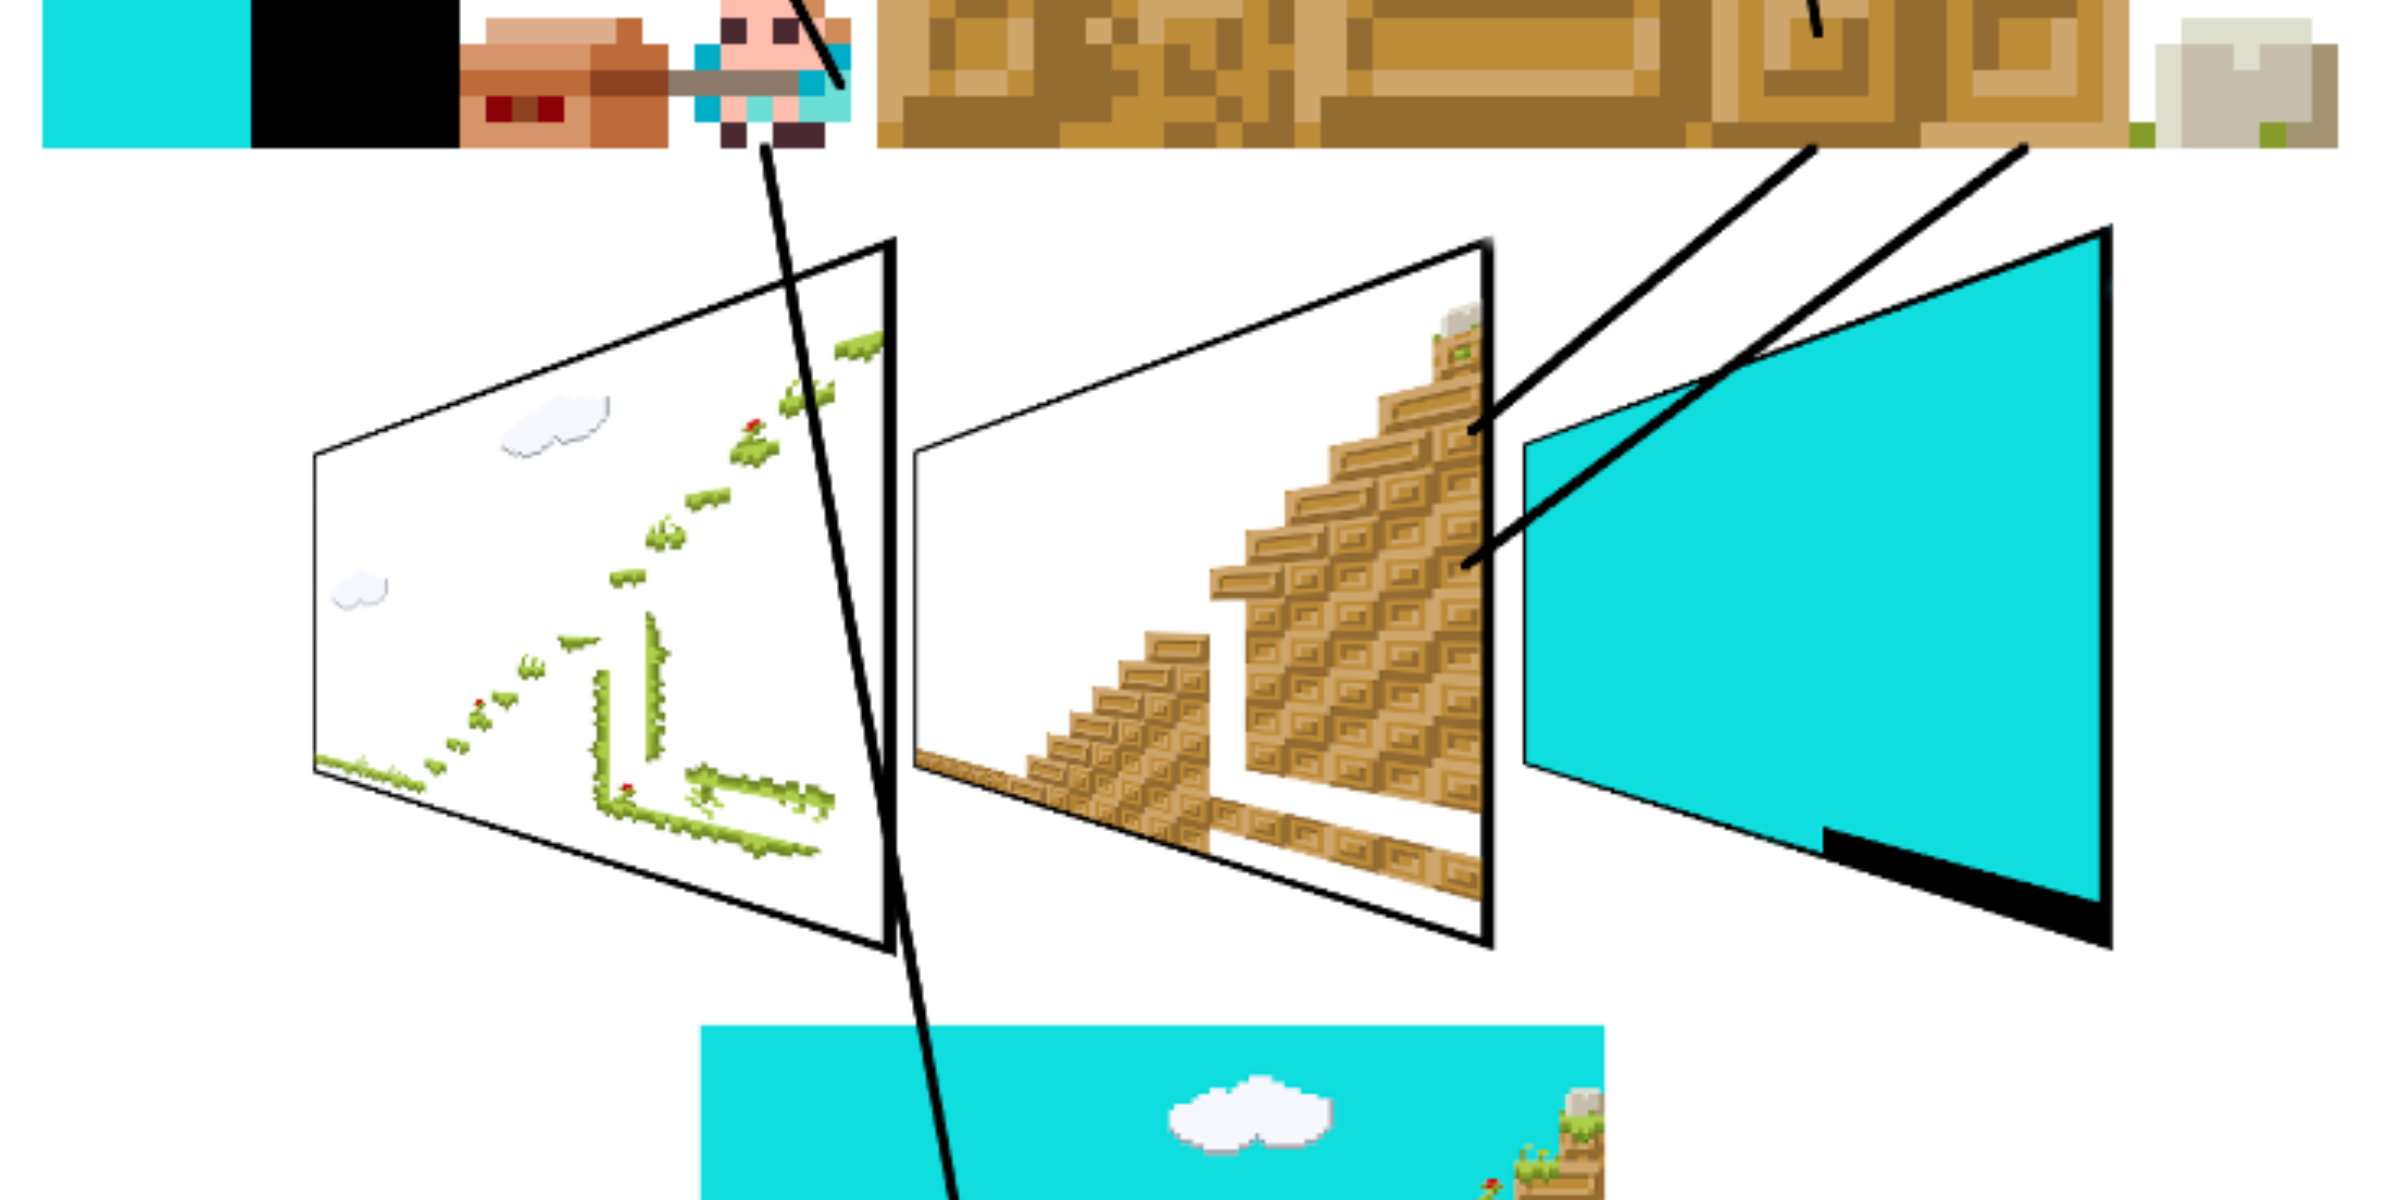
First, we have to understand how the consoles of that time (NES, game boy, mega drive/genesis, etc.) managed to render complex images on the screen despite their weak computing capabilities (a couple of megahertz from an 8-bit CPU). The solution was to offset all the heavy work to a graphics coprocessor, sometimes called a Picture Processing Unit (PPU). PPUs worked around four main features: the color palette, the tile set, tile maps, and sprites.
The color palette is a quite simple concept, an indexed collection of colors that can be displayed on the screen. For some consoles the palette was fixed, others supported multiple palettes that could be used at the same time. One color of the palette is usually reserved for transparency.
The tile set is a collection of small graphics (tiles), usually of fixed size like 8 by 8 pixels, that are effectively matrices of indexes in a color palette. The same tile could sometimes be used with different palettes. For example, Mario and Luigi can be drawn from the same tile but using two different palettes (red and green).
Tile maps are matrices of indexes in the tile set that form a large background image composed of tiles. Depending on the console, you can have multiple tile maps on the screen.
The sprites are graphics objects, composed of one or a couple tiles, that can be placed freely on the screen.
The picture below shows an example of palette, tiles, tile maps and sprites combined to compose a complex image on screen:

The PPU was a piece of hardware, so rendering complex scenes was fast (60 frames per second) and didn’t involve the CPU at all.
Simulating the PPU
As I said above, the goal of GESTE is to bring this kind of picture rendering to modern microcontrollers. Of course today’s generic microcontrollers don’t have PPUs, so everything has to be rendered from the CPU. And even if microcontroller CPUs are significantly more powerful than they used to be, it is a challenge to render multiple maps and sprites. Let’s see how we can achieve that.
Layers
A picture in GESTE is made of layers that roughly correspond to the tile maps and sprites of PPUs. There are three kinds of layers built-in, but you can implement your own:
Sprite layers to display a single tile at a given position
Grid layers to display a grid of tiles at a given position, similar to PPU tile maps
Text layers to display text at a given position
The Sprite and Grid layers are made of tiles, themselves made of colors in a palette, just like in a PPU.
Layers implement a function that returns a color for the given coordinates:
function Pix (This : Layer_Type;
                  X, Y : Integer)
                  return Output_Color;
Rendering
The rendering algorithm is somewhat similar to ray casting. Instead of taking each object of the scene and drawing it on the screen, the engine takes each pixel and tries to find its color from the different objects of the scene.
For each pixel of the area that is being drawn, GESTE will go through the list of layers and see if the corresponding pixel inside the layer is transparent or not. When a non transparent pixel is found, the pixel is pushed to the screen and the procedure starts again for the next pixel. If all the layers have a transparent pixel, a background color is used.

Depending on the performance of the CPU, the time it takes to update pixels on the screen or the complexity of the scene, it might not be possible to render the full screen for every frame.
For those reasons, GESTE is capable of rendering only the objects that have changed or moved since the previous frame. And for those objects, it will try to update the smallest area possible.

Pushing pixels to the screen
Most of the time when using a microcontroller and a screen, the screen will be connected through some kind of serial protocol (e.g. SPI or I2C) and it might not be possible to send a full frame 60 times per second. It is also possible that there is not enough RAM available to have a full frame buffer in memory all the time.
This is why GESTE rendering does not draw directly on the screen, it pushes pixels into a buffer (provided by the user) and then calls a function (provided by the user) to send that buffer to the screen:
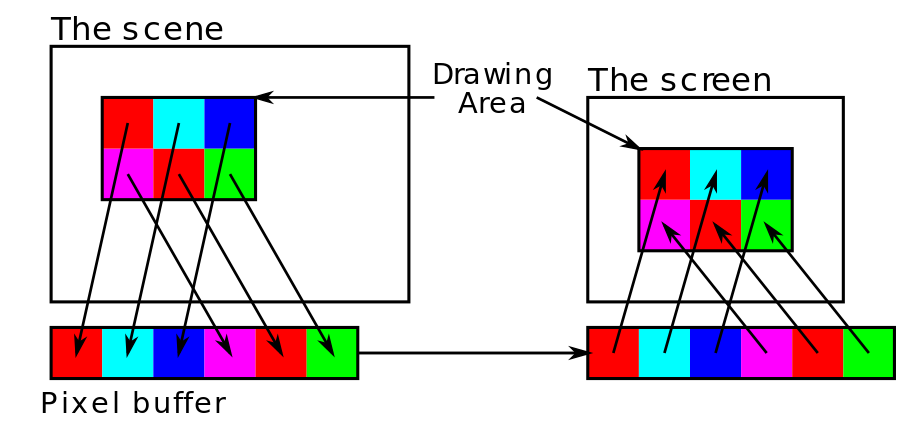
The best performance is achieved when sending the pixel buffer is offloaded to a Direct Memory Access (DMA) controller and the CPU can start to render the next pixel buffer while the first one is being sent to the screen.
Demo
With all those techniques combined, GESTE is capable of rendering complex scenes with multiple background layers, sprites and transparency on a 120MHz Cortex-M microcontroller with enough cycles left for game logic, physics engine and sound.
Here is one of the games that I developed with GESTE, “Shoot’n’loot”. It runs on an AdaFruit PyGamer board with a Microchip samd51 microcontroller:
If you own a PyGamer board, you can download the latest release of Shoot’n’loot here.
Otherwise, a PC version is available in the Alire package manager and should work fine on Windows and Linux (at least):
$ alr get shoot_n_loot
$ cd shoot_n_loot*
$ alr run
Conclusion
That’s it for the first part of this series. In the next one we will see how to create levels and graphics for GESTE using a tool called Tiled.
About Fabien Chouteau

Fabien joined AdaCore in 2010 after his engineering degree at the EPITA (Paris). He is involved in real-time, embedded and hardware simulation technology. Maker/DIYer in his spare time, his projects include electronics, music and woodworking.