
Highlighting Ada with Libadalang
by Pierre-Marie de Rodat –
While we are working very hard on semantic analysis in Libadalang, it is already possible to leverage its lexical and syntactic analyzers. A useful example for this is a syntax highlighter.
In the context of programming languages, syntax highlighters make it easier for us, humans, to read source code. For example, formatting keywords with a bold font and a special color, while leaving identifiers with a default style, enables a quick understanding of a program’s structure. Syntax highlighters are so useful that they’re integrated into daily developer tools:
- most “serious” code editors provide highlighters for tons of programming languages (C, Python, Ada, OCaml, shell scripts), markup languages (XML, HTML, BBcode), DSLs (Domain Specific Languages: SQL, TeX), etc.
probably all online code browsers ship syntax highlighters at least for mainstream languages: GitHub, Bitbucket, GitLab, …
From programming language theory, that many of us learned in engineering school (some even with passion!), we can distinguish two highlighting levels:
Tokens(lexeme)-based highlighting. Each token is given a style from its token kind (keyword, comment, integer literal, identifier, …).
Syntax-based highlighting. This one is higher-level: for example, give a special color for identifiers that give their name to functions and another color for identifiers that give their name to type declarations.
Most syntax highlighting engines, for instance pygments’s or vim’s, are based on regular expressions, which don’t offer to highlighter writers the same formalism as what we just described. Generally, regular expressions enable us to create an approximation of the two highlighting levels, which yields something a bit fuzzy. On the other hand, it is much easier to write such highlighters and to get pretty results quickly, compared to a fully fledged lexer/parser, which is probably why regular expressions are so popular in this context.
But here we already have a full lexer/parser for the Ada language: Libadalang. So why not use it to build a “perfect” syntax highlighter? This is going to be the exercise of the day. All blog posts so far only demonstrated the use of Libadalang’s Python API; Libadalang is primarily an Ada library, so let’s use its Ada API for once!
One disclaimer, first: the aim of this post is not to say that the world of syntax highlighters is broken and should be re-written with compiler-level lexers and parsers. Regexp-based highlighters are a totally fine compromise in contexts such as text editors; here we just demonstrate how Libadalang can be used to achieve a similar goal, but keep in mind that the result is not technically equivalent. For instance, what we will do below will require valid input Ada sources and will only work one file at a time, unlike editors that might need to work on smaller granularity items to keep the UI responsive, which is more important in this context than correctness.
Okay so, how do we start?
The first thing to do as soon as one wants to use Libadalang is to create an analysis context: this is an object that will enclose the set of sources files to process.
with Libadalang.Analysis;

package LAL renames Libadalang.Analysis;
Ctx : LAL.Analysis_Context := LAL.Create;
Good. At the end of our program, we need to release the resources that were allocated in this context:
LAL.Destroy (Ctx);Now everything interesting must happen in between. Let’s ask Libadalang to parse a source file:
Unit : LAL.Analysis_Unit := LAL.Get_From_File
   (Ctx, "my_source_file.adb", With_Trivia => True);
The analysis of a source file yields what we call in Libadalang an analysis unit. This unit is tied to the context used to create it.
Here, we also enable a peculiar analysis option: With_Trivia tells Libadalang not to discard “trivia” tokens. Inspired by the Roslyn Compiler, what we call a trivia token is a token that is ignored when parsing source code. In Ada as in most (all?) programming languages, comments are trivia: developers are allowed to put any number of them anywhere between two tokens, this will not change the validity of the program nor its semantics. Because of this most compiler implementations just discard them: keeping them around would hurt performance for no gain. Libadalang is designed for all kinds of tools, not only compilers, so we give the choice to the user of whether or not to keep trivia around.
What we are trying to do here is to highlight a source file. We want to highlight comments as well, so we need to ask to preserve trivia.
At this point, a real world program would have to check if parsing happened with no error. We are just playing here, so we’ll skip that, but you can have a look at the Libadalang.Analysis.Has_Diagnostic and Libadalang.Analysis.Diagnostics functions if you want to take care of this.
Fine, so we assume parsing went well and now we just have to go through tokens and assign a specific style to each of them. First, let’s have a look at the various token-related data types in Libadalang we have to deal with:
LAL.Token_Type: reference to a token/trivia in a specific analysis unit. Think of it as a cursor in a standard container. There is one special value: No_Token which, as you may guess, is used to represent the end of the token stream or just an invalid reference, like a null access.
LAL.Token_Data_Type: holder for the data related to a specific token. Namely: token kind, whether it’s trivia, index in the token/trivia stream and source location range.
Libadalang.Lexer.Token_Data_Handlers.Token_Index: a type derived from Integer to represent the indexes in token/trivia streams.
Then let’s define holders to annotate the token stream:
type Highlight_Type is (Text, Comment, Keyword, Block_Name, ...);Instead of directly assigning colors to the various token kinds, this enumeration defines categories for highlighting. This makes it possible to provide different highlighting styles later: one set of colors for a white background, and another one for a black background, for example.
subtype Token_Index is
   Libadalang.Lexer.Token_Data_Handlers.Token_Index;

type Highlight_Array is
   array (Token_Index range <>) of Highlight_Type;

type Highlights_Holder (Token_Count, Trivia_Count : Token_Index) is
record
   Token_Highlights  : Highlight_Array (1 .. Token_Count);
   Trivia_Highlights : Highlight_Array (1 .. Trivia_Count);
end record;
In Libadalang, even though tokens and trivia make up a logical interleaved stream, they are stored as two separate streams, hence the need for two arrays. So here is a procedure to make the annotating process easier:
procedure Set
  (Highlights : in out Highlights_Holder;
   Token      : LAL.Token_Data_Type;
   HL         : Highlight_Type)
is
   Index : constant Token_Index := LAL.Index (Token);
begin
   if LAL.Is_Trivia (Token) then
      Highlights.Trivia_Highlights (Index) := HL;
   else
      Highlights.Token_Highlights (Index) := HL;
   end if;
end Set;
Now let’s start the actual highlighting! We begin with the token-based one as described earlier.
Basic_Highlights : constant
  array (Libadalang.Lexer.Token_Kind) of Highlight_Type :=
 (Ada_Identifier => Identifier,
      Ada_All .. Ada_Return
    | Ada_Elsif | Ada_Reverse
    | -- ...
      => Keyword,
    --  ...
  );
The above declaration associate a highlighting class for each token kind defined in Libadalang.Lexer. The only work left is to determine highlighting classes iterating on each token in Unit:
Token : LAL.Token_Type := LAL.First_Token (Unit);

while Token /= LAL.No_Token loop
   declare
      TD : constant LAL.Token_Data_Type := LAL.Data (Token);
      HL : constant Highlight_Type :=
         Basic_Highlights (LAL.Kind (TD));
   begin
      Set (Highlights, TD, HL);
   end;
   Token := LAL.Next (Token);
end loop;
Easy, right? Once this code has run, we already have a pretty decent highlighting for our analysis unit! The second pass is just a refinement that uses syntax as described at the top of this blog post:
function Syntax_Highlight
  (Node : access LAL.Ada_Node_Type'Class) return LAL.Visit_Status;

LAL.Traverse (LAL.Root (Unit), Syntax_Highlight'Access);
LAL.Traverse will traverse Unit’s syntax tree (AST) and call the Syntax_Highlight function on each node. This function is a big dispatcher on the kind of the visited node:
function Syntax_Highlight
  (Node : access LAL.Ada_Node_Type'Class) return LAL.Visit_Status
is
   procedure Highlight_Block_Name
      (Name : access LAL.Name_Type'Class) is
   begin
      Highlight_Name (Name, Block_Name, Highlights);
   end Highlight_Block_Name;
begin
   case Node.Kind is
      when LAL.Ada_Subp_Spec =>
         declare
            Subp_Spec : constant LAL.Subp_Spec :=
               LAL.Subp_Spec (Node);

            Params : constant LAL.Param_Spec_Array_Access :=
               Subp_Spec.P_Node_Params;

         begin
            Highlight_Block_Name
              (Subp_Spec.F_Subp_Name, Highlights);
            Highlight_Type_Expr
              (Subp_Spec.F_Subp_Returns, Highlights);
            for Param of Params.Items loop
               Highlight_Type_Expr
                 (Param.F_Type_Expr, Highlights);
            end loop;
         end;

      when LAL.Ada_Subp_Body =>
         Highlight_Block_Name
           (LAL.Subp_Body (Node).F_End_Id, Highlights);

      when LAL.Ada_Type_Decl =>
         Set (Highlights,
              LAL.Data (Node.Token_Start),
              Keyword_Type);
         Highlight_Block_Name
           (LAL.Type_Decl (Node).F_Type_Id, Highlights);

      when LAL.Ada_Subtype_Decl =>
         Highlight_Block_Name
           (LAL.Subtype_Decl (Node).F_Type_Id, Highlights);

      --  ...
   end case;
   return LAL.Into;
end Syntax_Highlight;
Depending on the nature of the AST node to process, we apply specific syntax highlighting rules. For example, the first one above: for subprogram specifications (Subp_Spec), we highlight the name of the subprogram as a “block name” while we highlight type expressions for the return type and the type of all parameters as “type expressions”. Let’s go deeper: how do we highlight names?
procedure Highlight_Name
  (Name       : access LAL.Name_Type'Class;
   HL         : Highlight_Type;
   Highlights : in out Highlights_Holder) is
begin
   if Name = null then
      return;
   end if;

   case Name.Kind is
      when LAL.Ada_Identifier | LAL.Ada_String_Literal =>
         --  Highlight the only token that this node has
         declare
            Tok : constant LAL.Token_Type :=
              LAL.Single_Tok_Node (Name).F_Tok;
         begin
            Set (Highlights, LAL.Data (Tok), HL);
         end;

      when LAL.Ada_Dotted_Name =>
         --  Highlight both the prefix, the suffix and the
         --  dot token.

         declare
            Dotted_Name : constant LAL.Dotted_Name :=
               LAL.Dotted_Name (Name);
            Dot_Token   : constant LAL.Token_Type :=
               LAL.Next (Dotted_Name.F_Prefix.Token_End);
         begin
            Highlight_Name
              (Dotted_Name.F_Prefix, HL, Highlights);
            Set (Highlights, LAL.Data (Dot_Token), HL);
            Highlight_Name
              (Dotted_Name.F_Suffix, HL, Highlights);
         end;

      when LAL.Ada_Call_Expr =>
         --  Just highlight the name of the called entity
         Highlight_Name
           (LAL.Call_Expr (Name).F_Name, HL, Highlights);

      when others =>
         return;
   end case;
end Highlight_Name;
The above may be quite long, but what it does isn’t new: just as in the Syntax_Highlight function, we execute various actions depending on the kind of the input AST node. If it’s a mere identifier, then we just have to highlight the corresponding only token. If it’s a dotted name (X.Y in Ada), we highlight the prefix (X), the suffix (Y) and the dot in between as names. And so on.
At this point, we could create other syntactic highlighting rules for remaining AST nodes. This blog post is already quite long, so we’ll stop there.
There is one piece that is missing before our syntax highlighter can become actually useful: output formatted source code. Let’s output HTML, as this format is easy to produce and quite universal. We start with a helper analogous to the previous Set procedure, to deal with the dual token/trivia streams:
function Get
  (Highlights : Highlights_Holder;
   Token      : LAL.Token_Data_Type) return Highlight_Type
is
   Index : constant Token_Index := LAL.Index (Token);
begin
   return (if LAL.Is_Trivia (Token)
           then Highlights.Trivia_Highlights (Index)
           else Highlights.Token_Highlights (Index));
end Get;
And now let’s get to the output itself. This starts with a simple iteration on token, so the outline is similar to the first highlighting pass we did above:
Token     : LAL.Token_Type := LAL.First_Token (Unit);
Last_Sloc : Slocs.Source_Location := (1, 1);

Put_Line ("<pre>");
while Token /= LAL.No_Token loop
   declare
      TD         : constant LAL.Token_Data_Type :=
         LAL.Data (Token);
      HL         : constant Highlight_Type :=
         Get (Highlights, TD);
      Sloc_Range : constant Slocs.Source_Location_Range :=
         LAL.Sloc_Range (TD);

      Text : constant Langkit_Support.Text.Text_Type :=
         LAL.Text (Token);
   begin
      while Last_Sloc.Line < Sloc_Range.Start_Line loop
         New_Line;
         Last_Sloc.Line := Last_Sloc.Line + 1;
         Last_Sloc.Column := 1;
      end loop;

      if Sloc_Range.Start_Column > Last_Sloc.Column then
         Indent (Integer (Sloc_Range.Start_Column - Last_Sloc.Column));
      end if;

      Put_Token (Text, HL);
      Last_Sloc := Slocs.End_Sloc (Sloc_Range);
   end;
   Token := LAL.Next (Token);
end loop;
Put_Line ("</pre>");
The tricky part here is that tokens alone are not enough: we use the source location information (line and column numbers) associated to tokens in order to re-create line breaks and whitespaces: this is what the inner while loop and if statement do. As usual, we delegate “low-level” actions to dedicated procedures:
procedure Put_Token
  (Text : Langkit_Support.Text.Text_Type;
   HL   : Highlighter.Highlight_Type) is
begin
   Put ("<span style=""color: #" & Get_HTML_Color (HL)
        & ";"">");
   Put (Escape (Text));
   Put ("</span>");
end Put_Token;

procedure New_Line is
begin
   Put ((1 => ASCII.LF));
end New_Line;

procedure Indent (Length : Natural) is
begin
   Put ((1 .. Length => ' '));
end Indent;
Writing the Escape function, which wraps special HTML characters such as < or > into HTML entities (< and cie), and Get_HTML_Color, which returns a suitable hexadecimal string to encode the color corresponding to a highlighting category (for instance: #ff0000, i.e. the red color, for keywords) is left as an exercise to the reader.
Note that Escape must deal with a Text_Type formal. This type, which is really a subtype of Wide_Wide_String, is used to encode source excerpts in a uniform way in Libadalang, regardless of the input encoding. In order to do something useful with them, one must transcode it to UTF-8, for example. One way to do this is to use GNATCOLL.Iconv, but this is out of the scope of this post.
So here we are! Now you know how to:
parse Ada source files with Libadalang;
iterate on the stream of tokens/trivia in the resulting analysis unit, as well as process the associated data;
traverse the syntax tree of this unit;
combine the above in order to create a syntax highlighter.
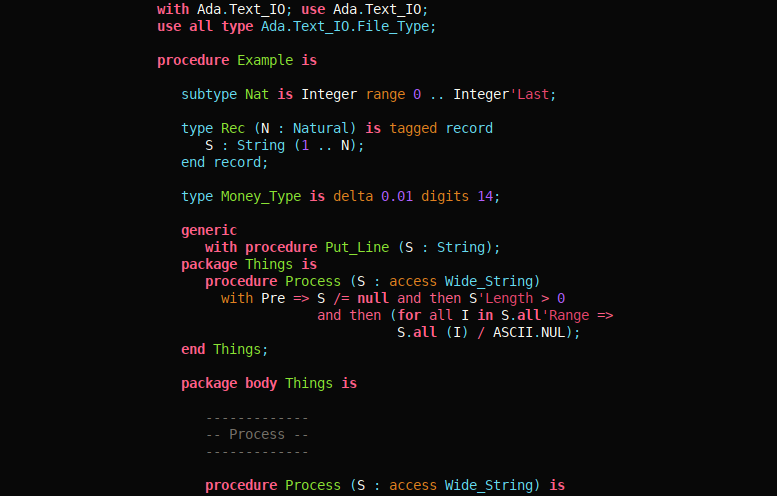
Thank you for reading this post to the end! If you are interested in pursuing this road, you can find a compilable set of sources for this syntax highlighter on Libadalang’s repository on Github. And because we cannot decently dedicate a whole blog post to a syntax highlighter without a little demo, here is one:
About Pierre-Marie de Rodat

Pierre-Marie joined AdaCore in 2013, after he got an engineering degree at EPITA (IT engineering school in Paris). He mainly works on GNATcoverage, GCC, GDB and Libadalang.