SPARKZumo Part 2: Integrating the Arduino Build Environment Into GPS
by Rob Tice –
This is part #2 of the SPARKZumo project where we go through how to actually integrate a CCG application in with other source code and how to create GPS plugins to customize features like automating builds and flashing hardware. To read more about the software design of the project visit the other blog post here.
The Build Process
At the beginning of our build process we have a few different types of source files that we need to bring together into one binary, Ada/SPARK, C++, C, and an Arduino sketch. During a typical Arduino build, the build system converts the Arduino sketch into valid C++ code, brings in any libraries (user and system) that are included in the sketch, synthesizes a main, compiles and links that all together with the Arduino runtime and selected BSP, and generates the resulting executable binary. The only step we are adding to this process is that we need to run CCG on our SPARK code to generate a C library that we can pass to the Arduino build as a valid Arduino library. The Arduino sketch then pulls the resulting library into the build via an include. **The CCG tool is available as part of a GNATPro product subscription and is not included with the GNAT Community release.**
Build Steps
From the user’s perspective, the steps necessary to build this application are as follows:
- Run CCG on the SPARK/Ada Code to produce C files and Ada Library Information files, or ali files. For more information on these files, see the GNAT Compilation Model documentation.
- Copy the resulting C files into a directory structure valid for an Arduino library
- We will use the lib directory in the main repo to house the generated Arduino library.
- Run c-gnatls on the ali files to determine which runtime files our application depends on.
- Copy those runtime files into the Arduino library structure.
- Make sure our Arduino sketch has included the header files generated by the CCG tool.
- Run the arduino-builder tool with the appropriate options to tell the tool where our library lives and which board we are compiling for.
- The arduino-builder tool will use the .build directory in the repo to stage the build
- Then we can flash the result of the compilation to our target board.
That seems like a lot of work to do every time we need to make a change to our software!
Since these steps are the same every time, we can automate this. Since we should try to make this as host agnostic as possible, meaning we would like for this to be used on Windows and Linux, we should use a scripting language which is fairly host agnostic. It would also be nice if we could integrate this workflow into GPS so that we can develop our code, prove our code, and build and flash our code without leaving our IDE. It is an Integrated Development Environment after all.
Configuration Files
The arduino-builder program is the command line version of the Arduino IDE. When you build an application with the Arduino IDE it creates a build.options.json file with the options you select from the IDE. These options include the location of any user libraries, the hardware to build for, where the toolchain lives, and where the sketch lives. We can pass the same options to the arduino-builder program or we can pass it the location of a build.options.json file.
For this application I put a build.options.json file in the conf directory of the repository. This file should be configured properly for your build system. The best way, I have found, to get this file configured properly is to install the Arduino IDE and build one of the example applications. Then find the generated build.options.json file generated by the IDE and copy that into the conf directory of the repository. You then only need to modify:
- The “otherLibrariesFolders” to point to the absolute path of the lib folder in the repo.
- The”sketchLocation” to point at the SPARKZumo.ino file in the repo.
The other conf files in the conf directory are there to configure the flash utilities. When flashing the AVR on the Arduino Uno, the avrdude flash utility is used. This application takes the information from the flash.yaml file and the path of the avrdude.conf file to configure the flash command. Avrdude uses this to inform the flashing utility about the target hardware. The HiFive board uses openocd as its flashing utility. The openocd.cfg file has all the necessary configuration information that is passed to the openocd tool for flashing.
The GPS Plugin
[DISCLAIMER: This guide assumes you are using version 18.1 or newer of GPS]
Under the hood, GPS, or the GNAT Programming Studio, has a combination of Ada, graphical frameworks, and Python scripting utilities. Using the Python plugin interface, it is very easy to add functionality to our GPS environment. For this application we will add some buttons and menu items to automate the process mentioned above. We will only be using a small subset of the power of the Python interface. For a complete guide to what is possible you can visit the Customizing and Extending GPS and Scripting API Reference for GPS sections of the GPS User’s Guide.
Plugin Installation Locations
Depending on your use case you can add Python plugins in a few locations to bring them into your GPS environment. There are already a handful of plugins that come with the GPS installation. You can find the list of these plugins by going to Edit->Preferences and navigating to the Plugin tab (near the bottom of the preferences window on the left sidebar). Because these plugins are included with the installation, they live under the installation directory in <installation directory>/share/gps/plug-ins. If you would like to modify you installation, you can add your plugins here and reload GPS. They will then show up in the plugin list. However, if you reinstall GPS, it will overwrite your plugin!
There is a better place to put your plugins such that they won’t disappear when you update your GPS installation. GPS adds a folder to your Home directory which includes all your user defined settings for GPS, such as your color theme, font settings, pretty printer settings, etc. This folder, by default, lives in <user’s home directory>/.gps. If you navigate to this folder you will see a plug-ins folder where you can add your custom plugins. When you update your GPS installation, this folder persists.
Depending on your application, there may be an even better place to put your plugin. For this specific application we really only want this added functionality when we have the SPARKzumo project loaded. So ideally, we want the plugin to live in the same folder as the project, and to load only when we load the project. To get this functionality, we can name our plugin <project file name>.ide.py and put it in the same directory as our project. When GPS loads the project, it will also load the plugin. For example, our project file is named zumo.gpr, so our plugin should be called zumo.ide.py. The source for the zumo.ide.py file is located here.
The Plugin Skeleton
When GPS loads our plugin it will call the initialize_project_plugin function. We should implement something like this to create our first button:
import GPS
import gps_utils
class ArduinoWorkflow:
def __somefunction(self):
# do stuff here
def __init__(self):
gps_utils.make_interactive(
callback=self.__somefunction,
category="Build",
name="Example",
toolbar='main',
menu='/Build/Arduino/' + "Example",
description="Example")
def initialize_project_plugin():
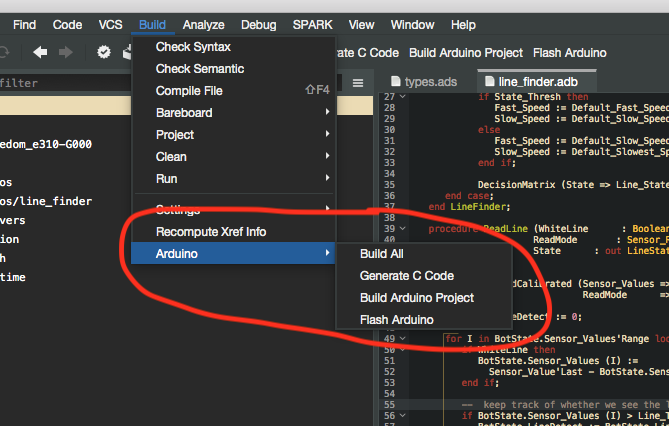
ArduinoWorkflow()This simple class will create a button and a menu item with the text Example. When we click this button or menu item it will callback to our somefunction function. Our actual plugin creates a few buttons and menu items that look like this:

Task Workflows
Now that we have the ability to run some scripts by clicking buttons we are all set! But there’s a problem; when we execute a script from a button, and the script takes some time to perform some actions, GPS hangs waiting for the script to complete. We really should be executing our script asynchronously so that we can still use GPS while we are waiting for the tasks to complete. Python has a nice feature called coroutines which can allow us to run some tasks asynchronously. We can be super fancy and implement these coroutines using generators!
Or…
ProcessWrapper
GPS has already done this for us with the task_workflow interface. The task_workflow call wraps our function in a generator and will asynchronously execute parts of our script. We can modify our somefunction function now to look like this:
def __somefunction(self, task):
       task.set_progress(0, 1)
       try:
           proc = promises.ProcessWrapper(["script", "arg1", "arg2"], spawn_console="")
       except:
           self.__error_exit("Could not launch script.")
           return
       ret, output = yield proc.wait_until_terminate()
       if ret is not 0:
           self.__error_exit("Script returned an error.")
           return
       task.set_progress(1, 1)
In this function we are going to execute a script called script and pass 2 arguments to it. We wrap the call to the script in a ProcessWrapper which returns a promise. We then yield on the result. The process will run asynchronously, and the main thread will transfer control back to the main process. When the script is complete, the yield returns the stdout and exit code of the process. We can even feed some information back to the user about the progress of the background processes using the task.set_progress call. This registers the task in the task window in GPS. If we have many tasks to run, we can update the task window after each task to tell the user if we are done yet.
TargetWrapper
The ProcessWrapper interface is nice if we need to run an external script but what if we want to trigger the build or one of the gnat tools?
Triggering CCG
Just for that, there’s another interface: TargetWrapper. To trigger the build tools, we can run something like this:
builder = promises.TargetWrapper("Build All")
retval = yield builder.wait_on_execute()
if retval is not 0:
     self.__error_exit("Failed to build all.")
     return
With this code, we are triggering the same action as the Build All button or menu item.
Triggering GNATdoc
We can also trigger the other tools within the GNAT suite using the same technique. For example, we can run the GNATdoc tool against our project to generate the project documentation:
gnatdoc = promises.TargetWrapper("gnatdoc")
retval = yield gnatdoc.wait_on_execute(extra_args=["-P", GPS.Project.root().file().path, "-l"])
   if retval is not 0:
           self.__error_exit("Failed to generate project documentation.")
           return
Here we are calling gnatdoc with the arguments listed in extra_args. This command will generate the project documentation and put it in the directory specified by the Documentation_Dir attribute of the Documentation package in the project file. In this case, I am putting the docs in the docs folder of the repo so that my GitHub repo can serve those via a GitHub Pages website.
Accessing Project Configuration
The file that drives the GNAT tools is the GNAT Project file, or the gpr file. This file has all the information necessary for GPS and CCG to process the source files and build the application. We can access all of this information from the plugin as well to inform where to find the source files, where to find the object files, and what build configuration we are using. For example, to access the list of source files for the project we can use the following Python command: GPS.Project.root().sources().
Another important piece of information that we would like to get from the project file is the current value assigned to the “board” scenario variable. This will tell us if we are building for the Arduino target or the HiFive target. This variable will change the build configuration that we pass to arduino-builder and which flash utility we call. We can access this information by using the following command: GPS.Project.root().scenario_variables(). This will return a dictionary of all scenario variables used in the project. We can then access the “board” scenario variable using the typical Python dictionary syntax GPS.Project.root().scenario_variables()[‘board’].
Determining Runtime Dependencies
Because we are using the Arduino build system to build the output of our CCG tool, we will need to include the runtime dependency files used by our CCG application in the Arduino library directory. To detect which runtime files we are using we can run the c-gnatls command against the ali files generated by the CCG tool. This will output a set of information that we can parse. The output of c-gnatls on one file looks something like this
$ c-gnatls -d -a -s obj/geo_filter.ali
geo_filter.ads
geo_filter.adb
<CCG install direction>/libexec/gnat_ccg/lib/gcc/x86_64-pc-linux-gnu/7.3.1/adainclude/interfac.ads
<CCG install directory>/libexec/gnat_ccg/lib/gcc/x86_64-pc-linux-gnu/7.3.1/adainclude/i-c.ads
line_finder_types.ads
<CCG install directory>/libexec/gnat_ccg/lib/gcc/x86_64-pc-linux-gnu/7.3.1/adainclude/system.ads
types.ads
When we parse this output we will have to make sure we run c-gnatls against all ali files generated by CCG, we will need to strip out any files listed that are actually part of our sources already, and we will need to remove any duplicate dependencies. The c-gnatls tool also lists the Ada versions of the runtime files and not the C versions. So we need to determine the C equivalents and then copy them into our Arduino library folder. The __get_runtime_deps function is responsible for all of this work.
Generating Lookup Tables
If you had a chance to look at the first blog post in this series, I talked about a bit about code in this application that was used to do some filtering of discrete states using a graph filter. This involved mapping some states onto some physical geometry and sectioning off areas that belonged to different states. The outcome of this was to map each point in a 2D graph to some state using a lookup table.
To generate this lookup table I used a python library called shapely to compute the necessary geometry and map points to states. Originally, I had this as a separate utility sitting in the utils folder in the repo and would copy the output of this program into the geo_filter.ads file by hand. Eventually, I was able to bring this utility into the plugin workflow using a few interesting features of GPS.
GPS includes pip
Even though GPS has the Python env embedded in it, you can still bring in outside packages using the pip interface. The syntax for installing an external dependency looks something like:
import pip
ret = pip.main(["install"] + dependency)
Where dependency is the thing you are looking to install. In the case of this plugin, I only need the shapely library and am installing that when the GPS plugin is initialized.
Accessing Ada Entities via Libadalang
The Libadalang library is now included with GPS and can be used inside your plugin. Using the libadalang interface I was able to access the value of user defined named numbers in the Ada files. This was then passed to the shapely application to compute the necessary geometry.
ctx = lal.AnalysisContext()
unit = ctx.get_from_file(file_to_edit)
myVarNode = unit.root.findall(lambda n: n.is_a(lal.NumberDecl) and n.f_ids.text=='my_var')
value = int(myVarNode[0].f_expr.text)
This snippet creates a new Libadalang analysis context, loads the information from a file and searches for a named number declaration called ‘my_var’. The value assigned to ‘my_var’ is then stored in our variable value.
I was then able to access the location where I wanted to put the output of the shapely application using Libadalang:
array_node = unit.root.findall(lambda n: n.is_a(lal.ObjectDecl) and n.f_ids.text=='my_array')
agg_start_line = int(array_node[0].f_default_expr.sloc_range.start.line)
agg_start_col = int(array_node[0].f_default_expr.sloc_range.start.column)
agg_end_line = int(array_node[0].f_default_expr.sloc_range.end.line)
agg_end_col = int(array_node[0].f_default_expr.sloc_range.end.column)
This gave me the line and column number of the start of the array aggregate initializer for the lookup table ‘my_array’.
Editing Files in GPS from the Plugin
Now that we have the computed lookup table, we could use the typical python file open mechanism to edit the file at the location obtained from Libadalang. But since we are already in GPS, we could just use the GPS.EditorBuffer interface to edit the file. Using the information from our shapely application and the line and column information obtained from Libadalang we can do this:
buf = GPS.EditorBuffer.get(GPS.File(file_to_edit))
agg_start_cursor = buf.at(agg_start_line, agg_start_col)
agg_end_cursor = buf.at(agg_end_line, agg_end_col)
buf.delete(agg_start_cursor, agg_end_cursor)
array_str = "(%s));" % ("(%s" % ("),\n(".join([', '.join([item for item in row]) for row in array])))
buf.insert(agg_start_cursor, array_str[agg_start_col - 1:])
First we open a buffer to the file that we want to edit. Then we create a GPS.Location for the beginning and end of the current array aggregate positions that we obtained from Libadalang. Then we remove the old information in the buffer. We then turn the array we received from our shapely application into a string and insert that into the buffer.
We have just successfully generated some Ada code from our GPS plugin!
Writing Your Own Python Plugin
Most probably, there is already a plugin that exists in the GPS distribution that does something similar to what you want to do. For this plugin, I used the source for the plugin that enables flashing and debugging of bare-metal STM32 ARM boards. This file can be found in your GPS installation at <install directory>/share/gps/support/ui/board_support.py. You can also see this file on the GPS GitHub repository here.
In most cases, it makes sense to search through the plugins that already exist to get a starting point for your specific application, then you can fill in the blanks from there. You can view the entire source of GPS on AdaCore’s Github repository.
That wraps up the overview of the build system for this application. The source for the project can be found here. Feel free to fork this project and create new and interesting things.
Happy Hacking!
About Rob Tice

Rob Tice joined AdaCore in 2016 and is now the Lead Technical Account Manager and the CodePeer Product Manager based in US. With a degree in Electrical Engineering from Rensselaer Polytechnic Institute, he has worked in the industrial automation and music technology industries as a hardware engineer and embedded software engineer where he specialized in the development of real-time, embedded applications. At AdaCore, Rob is a technical resource for the sales team, working with customers to understand and solve their technical challenges. He also conducts consulting, training, and mentorship activities for AdaCore’s customers.